Quilt Lessons

Assembling Quilt Layers
A "quilt" consists of 3 layers: the backing, the batting and the decorative top layer. After assembling the layers, the item is quilted, either by hand or machine. This stitching holds the three layers together.
Smaller items, such as hot pads and placemats, do not require quilting. Quilting can be added for decorative purposes.
Quilts (all sizes), placemats and other layered items are assembled in the following way: quilt back on the bottom - wrong side up, batting on top of backing, quilt top on the top - right side up.
Aligning Layers
There are many different methods for aligning your layers. Techniques differ. I advise you to refer to a good quilter's book for instruction. This is the technique I use. If you have a large table to lay your quilt out on, use it. If a table is not available, use any large, clean surface. Lay the backing down first, wrong side up. Lay the batting over the backing. Lay the quilt top on top, right side up. Measure your quilt diagonally and mark the center. Measure on the other diagonal and mark the center. The two centers should align: if not, adjust the quilt. Pin the layers together in the center. Keep layers of fabric taut (smooth out wrinkles). Move out from the center and pin again. Do this in each direction. Keep doing this until you have the three layers pinned throughout the quilt (baste the layers for hand quilting). When finished pinning, baste the outer edges of the layers together; trim. You are now ready for machine or hand quilting (or tie-off: explained on page 6) and binding.
Batting / Backing

There are several different types and weights of batting. Thickness is called loft. Use a thicker batting (more loft) for fluffy comforter type quilts that you plan to tie off. Use a thinner batting for hand quilting. I like to use 100% cotton batting, but synthetic battings are supposed to be easier to sew through. I use crafter's felt or fusible fleece for small projects (such as placemats).
For quilts, the weight of batting chosen depends on several factors. Will the item be hand quilted? Is warmth important? Do you prefer natural cotton? A sales person at a quilting store can help you choose the correct batting for your project.
I like to have my batting and backing a bit larger than my quilt top. After pinning the layers together, then quilting them together, the excess can be trimmed as shown at right.
Most quilters prefer to use backing fabric that is similar in weight to the top layer. Many people use bed sheets. Others like to use a nice flannel for comfort. Be sure that the fabric you choose is easy to quilt through and goes well with your quilt. Backing can be purchased in widths for quilts. A word of caution here - I prefer to prewash (and preshrink) my fabrics. If I do this with the fabrics used on the quilt top, I also preshrink my backing. Other quilters I know never prewash the fabric. They prefer the stiffness that comes with new fabric. You will choose your own preferences over time.
An iron-on batting is nice because it is ironed onto the wrong side of the quilt backing piece, and can be re-positioned later if needed. Once it is in place, the quilt top can be ironed on over it. The three layers are held in place until you are ready to stitch them together. NOTE: Iron-on batting is not easier for everyone. I have found that I prefer to pin my layers together.
Alternative To Batting (small projects)
Fusible fleece (for placemats or small wall hangings) is nice, too, because it holds the layers together until they are stitched. I often use fusible fleece for placemats.
Binding - Straight or Continuous Bias Binding
Once a quilt top is pieced, it is layered with batting and backing. The edges of the quilt are still unfinished, however. To add a nice finished edge to the quilt, binding is added. Binding is a strip of fabric cut to various widths depending on the size of the project and the desired effect. The strip of binding runs all the way around the outer edge of the quilt.
My preferred method of attaching the binding to a quilt is to pin the binding on the right side of the quilt, close to the quilt outer edge, and stitch it all the way around (see below for Mitered Corners). Then I turn the binding strip to the back side of the quilt (fold it over the edge all the way around) and hand stitch the binding to the back of the quilt.
Binding can be a single layer of fabric, or a double layer. To create a stronger, double layer, the strip can be folded in half lengthwise - this is recommended for larger quilts.
Straight or Bias Cut Binding
Binding can be cut on the bias or cut straight grain, depending on your preference (bias cut is usually preferred for larger quilts).
Straight cut is simply made by cutting a strip of fabric. This is fine for small projects.
Bias binding is cut on the bias, which provides some stretch and strength. This is the preferred method for larger items, such as quilts.
In the following photo, the outer black strip is the binding.

Make Your Own Bias Binding
Bias binding allows some give, and stretch, so is better for larger items, such as quilts.

A long, continuous strip of binding can be made quickly and easily by the following method. By creating binding on the bias, the binding has more flexibility; this flexibility allows it to bend around corners and curved areas. Bias strips can be used for applique (stems of flowers, for example) as well as binding for quilts, placemats, pot holders and other items that need a nice finishing for raw edges.
1. Cut a strip of fabric (cut straight rather than on the bias). A 5" x 44" strip will yield approximately 2.5 yards of 1/4" wide finished binding. Lay out the strip of fabric wrong side up.

2. Fold down the upper left corner. Press to create crease. Unfold.

3. Using a fabric marker, draw lines parallel to the crease (crease shown in light green below). Draw segments four times the width of the finished binding. For example, for 1/4 inch finished binding, mark the segments 1 inch wide.

4. Cut away unmarked corners.

5. Pin the fabric strip right sides together, lining up marked lines. Align the segments so that one width of binding extends beyond the edge on each end.

The fabric strip will form a tube as you pin the sides together. Stitch right sides together along pinned edges, using a 1/4" seam allowance. Press seam open.

6. Begin cutting along the marked line. Cut around and around the tube until you come to the end of your line. You will now have one, long, continuous strip of bias binding.
Go to Trivet Pattern for directions on using bias binding on a round object. It is a very easy beginner sewing project, and provides practice using bias binding.

Instructions For Using A Bias Tape Maker
Once the bias strip is made it must be folded and pressed. The outer edges are turned under 1/4" and pressed to create nicely finished edges. This is a tedious task that is made easier with the use of a bias tape maker. These inexpensive, but clever tools fold the edges so that they can be ironed.
1. Snip off one end diagonally so that you have a sharp point.
2. Begin feeding the pointed end through the tape maker (feed through widest end of tape maker).
3. Pull And Iron. Pull the metal handle to the left as you iron from the right. This takes a bit of practice, but is worth the small effort. The fabric is ironed as it emerges, quickly creating finished bias tape.
Finishing Without Binding
Small pieces (such as hot pads or placemats) can be finished without the use of binding.
Method One
Trim the batting or felt .5" smaller in height and width than your small quilt top and backing pieces. Iron under a 1/4" hem around all four sides of your quilt back and quilt top. Now, layer the batting on top of the wrong side of the quilt backing. Fold the quilt backing hem over the batting edges, so the batting edges are hidden under the hem of the backing. Lay the top layer over the other two layers. Stitch through all three layers, very close to the edge (a zipper foot is helpful here). NOTE: It may be helpful to use a temporary roll-on or iron-on bond adhesive to hold the edges for you before they are sewn (caution: some iron-on adhesives cannot be sewn through - they are used in place of sewing). I would recommend hand basting through all three layers before your final stitching is done.

Method Two
Another method for finishing a piece without use of binding (I use this on my placemats) is to fuse or baste the batting (or fleece) to the wrong side of the backing fabric. Then, stitch the backing to the front fabric, right sides together, leaving an area open for turning. I use a .25" seam allowance. Turn the placemat right side out, then top stitch all the way around. My apple placemat was created this way.
Mitered Corners Of Binding
What about corners?
Mitered corners allow the binding to curve around the corners of the quilt (or placemat or hot pad). Mitered corners create a nicely finished corner.
Mitered Corners - Front
Press under .25" of the starting end of your binding piece. The photo shows the start and end of the binding. I folded down the end of the binding so you can see the starting point. This will give a finished end to the start of yoru binding. Start stitching the the long, raw edge of the binding to the raw edge of the quilt top, right sides together, about 1/3 of the way up one side of the quilt (where your eye won't pick up the place where the two binding ends will meet). See figure 1. Stop stitching .25" from the end. See figure 2.
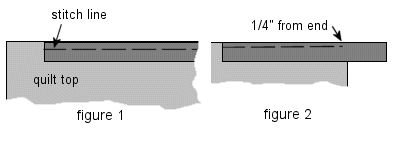
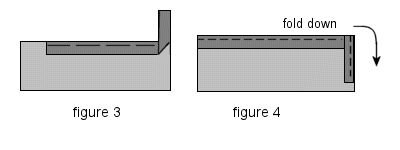
Pivot your project and fold the binding straight up, away from you. This will create a 45-degree fold line. See figure 3. Fold the binding straight down, lining up edges. Stitch from top edge. See figure 4.
Continue stitching around, creating mitered corners as you go. When you come around to where you began, stitch the two binding ends together and stitch the last area of binding into place.
Mitered Corners - Back
Turn the binding to the back of your quilt. A mitered corner will automatically form on the front side, but you must help things a bit on the back. First, fold one corner down at a 45 degree angle from the corner (figure 1 below).
Then, fold under one side, creating a mitered corner fold (figure 2 below).
Last, turn under the other side, creating a mitered corner fold (figure 3 below). Press well and hand stitch into place using an invisible hem stitch around all loose edges.

The following photo shows the binding after it has been stitched to the front and folded over and pinned into place on the back. This photo also shows part of the hanging sleeve. I hand stitched the binding into place on the back.

Practice Binding On Small Projects
Go to our Free Kitchen Patterns for free placemat patterns. Or, visit our Free Quilt Patterns for free lap quilt and baby quilt patterns. These are good projects to practice binding.
page 1 page 2 page 3 page 4 page 5 page 6
Pillow Patterns


Holiday Decor Projects


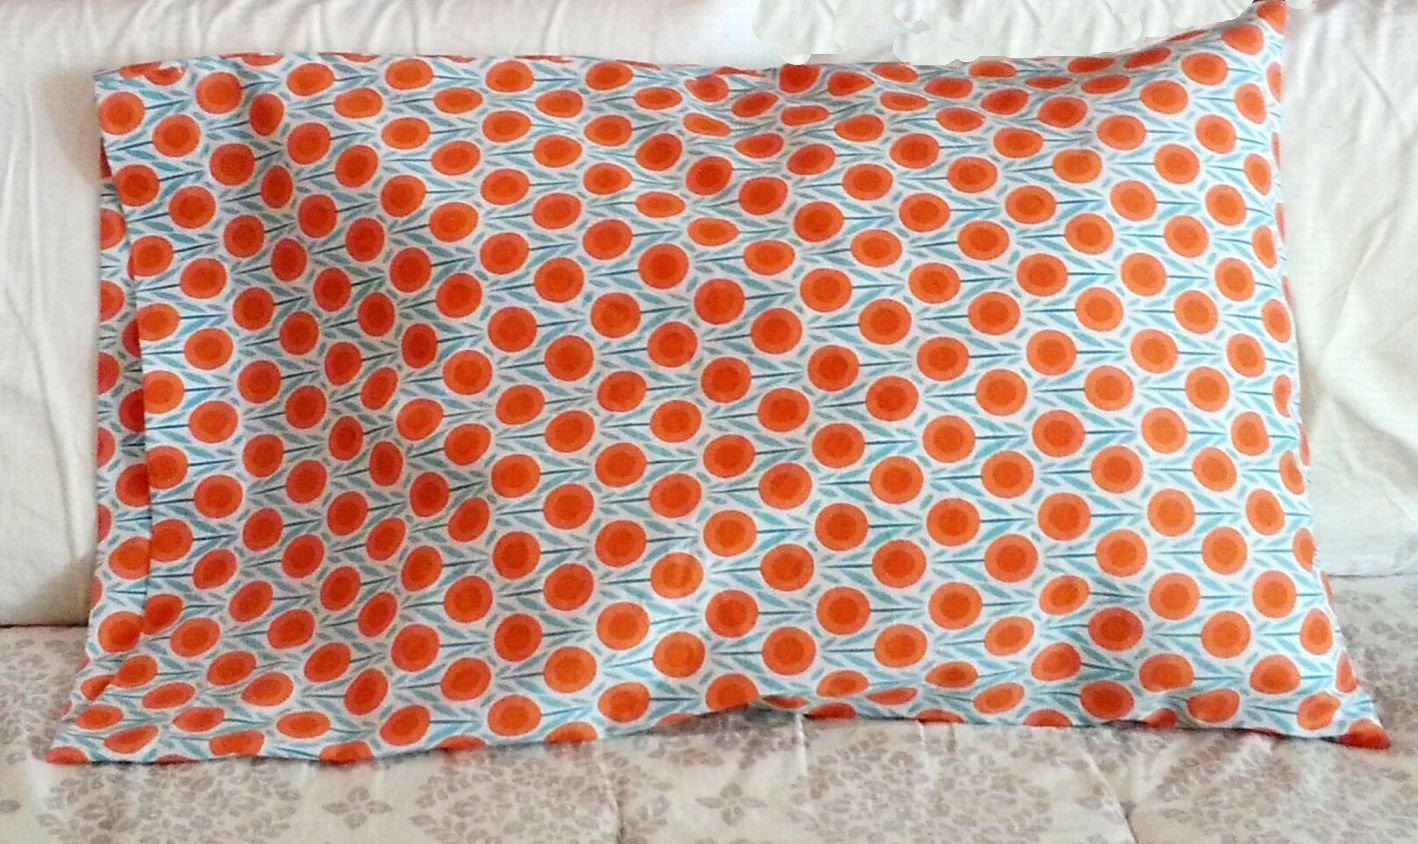
Nicely constructed pillowcase with contrast cuff and piping trim. Cuff is nicely finished on the inside. Free sewing pattern with directions for standard, queen and king.