Spring Basket Quilt Block

Use either of these beautiful pattern as a quilt block, pillow front, or hot pad / trivet.
Disclosure: This site contains affiliate links. As an Amazon Associate, I earn from qualifying purchases. Clicking on links, and purchasing products, may result in the seller paying us compensation - at no extra cost to you. Affiliate links are in green.
Also see:
Follow Our Adventures
Kitchen Sewing Patterns
Quilt Lessons & Patterns
Art Projects
Hot Pad - pieced quilt block
Quilt Block / Hot Pad Size
The finished block size measures approximately 9.5" x 9.5".
SUPPLIES
Insulation
I used Insul-Bright by the Warm Company. This material provides insulation and heat resistance. You can also use heavy quilt batting.
Project Supplies
The finished Placemat measures approximately 11" x 13" (without lace). Fabric: choose your own colors for fabric: I will refer to the colors shown in my top photo.
One fat quarter EACH of pink floral, purple solid, and blue
One 9.5" square of white for backing
Two 9.5" squares of batting (use cotton if using batting) or Insul-Bright Insulation
NOTE: Unless you use proper insulation, use this item as a decorative hot pad only.
Paper for drawing pattern pieces
Sewing Supplies
thread
sewing scissors
quilting pins
large sewing ruler
fabric marking pencils
seam ripper
rotary cutter and mat (optional but nice)
Go to: Quilt Lessons to learn how to make your own bias tape.
DIRECTIONS
All seams are 1/4”
1. Create Pattern Pieces
Draw basket pattern pieces 1-3 as shown in the diagram below. Label the pattern pieces 1, 2 and 3.
Draw a heart pattern like that shown below. NOTE: the heart is drawn onto a piece of paper that is 3" x 2.5", folded down the center to make 1.5" x 2.5"

2. Cut Basket Fabric
Cut one triangle of pink floral from Pattern Piece #1
Cut one triangle of pink floral from Pattern Piece #2
Cut two rectangles of pink floral each 2 3/4" x 5"
Cut one triangle of purple from Pattern Piece #1
Cut two triangles of purple from Pattern Piece #3
Cut one bias strip of purple that measures 1.25" x 9" (for handle) - NOTE: this MUST be cut on the bias
Cut heart from blue fabric: cut it 1/4" LARGER all the way around than the pattern piece if you wish to turn under the edges
3. Attach Handle

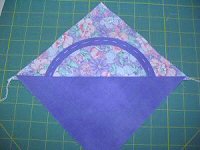
Iron under both long sides of the handle piece. Cut a half oval or half circle out of paper and pin that to the pink floral triangle to use as a guide for the handle placement. The oval should be about 5" from one end of the handle to the other. Pin handle to large pink floral triangle (#1), using the paper as a guide. Baste handle into place. Remove paper. Refer to the following photo.
4 Assemble Block
Stitch #1 purple to pink floral with handle, right sides together, as shown. Press seam open.
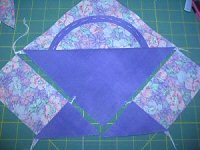
Stitch a pink floral rectangle to a #3 purple triangle. Press seam open. Repeat. You will have two rectangles with a triangle attached on on end. Note how triangle exceeds down past rectangle.
This is correct when sewing points in quilt blocks.

Stitch one rectangle/triangle piece to one basket side. Press seam open. Repeat with other side. Refer to the photos below.
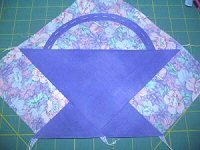
Stitch the #2 fabric piece (background floral print) triangle to the bottom edge of basket, right sides together. Press seam open.
Note: the photo below shows the lower triangle #2 attached, as well as the binding.

Hand stitch the handle into place, using tiny, "invisible" stitches. Stitch the inner curve of the handle first, then the outside curve. Remove the basting.
5. Attach Heart Applique
There 3 methods for attaching the heart applique piece.
a. Hand Stitch Using Paper As Guide
Place the pattern piece onto the wrong side of the blue heart. Your heart fabric will extend 1/4" beyond the pattern piece all the way around. Clip heart where necessary.
Iron under the edges of the heart, using the pattern edges to assist you in creating nice curves. Remove paper; hand applique the heart into place on the basket.
b. Machine Stitch
Cut out the fabric heart the same size as the pattern piece. Machine stitch (I usually use a narrow satin stitch) around the outer edge.
c. Use Iron-On Adhesive
This is my preferred method. Go to Step 2 of Trivet (bottom of page) for directions. After using the fusible web (iron-on adhesive), you can hand or machine stitch for further security.
6. Assemble Pot Holder
Square down quilt block to a size measuring 9.5" x 9.5". To learn how to square down a block, go to Quilt Lessons: Square Down Block
If you have not done so yet, cut a piece of backing measuring 9.5" x 9.5" (white).
OR use therma flec scorch resistant cloth as backing.
Layer your backing wrong side up, then the batting, then the insulation, then another layer of batting, then the quilt block top right side up. Baste the three layers together.
7. Add Binding
Cut binding into 1.75" wide strips; stitch binding pieces to form long enough binding to go all the way around your pot holder, plus about 12" extra.
Iron under 1/4" on one long side of binding. Stitch it around the outer edge, making mitered corners. When, finished, trim off unused binding, leaving a "tail" that is about 5". Iron under both sides of binding, plus end. Refer to the following photos.
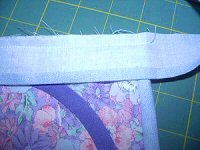


Stitch the open edge of the tail closed. Refer to photo below. Twist the tail into a loop and hand or machine stitch onto back of pot holder. This forms the hanger.

Trivet - appliqued quilt block
SUPPLIES

Basket Block:
1 fat quarter for basket and handle (22" x 18")
9.5" square of fabric for background
9.5" square of fabric for backing
9.5" square of fabric for insulation
1 piece of fabric measuring 2" x 2" for heart
You also need bias binding
DIRECTIONS
All seams are 1/4”
1. Draw Basket Pattern

Draw a straight line 8" across
Find the center of that line, and make a dot 4" under the line, in the center. Connect the ends of the line with the dot. You now have a triangle that is 4" high and 8" wide. Draw lines out from the side lines, perpendicular. You now have a basket pattern.
2. Create The Heart Applique
Draw a heart on the paper side of a 2" square piece of fusible web. Follow the directions on the iron-on adhesive to fuse it to the wrong side of your heart applique fabric. Be sure that the rough side is next to the back of your fabric. The paper side should be toward your ironing board (away from the fabric piece, because it will be pulled off). After the adhesive is ironed onto your applique piece, cut out the heart; then remove the paper backing.

3. Create Handle
Cut out your basket pattern. Lay your basket pattern onto the paper side of fusible web. The fusible web should be just large enough for the basket pattern. Trace the basket onto the fusible web (paper side). Fuse the fusible web to the wrong side of the basket fabric. Leave enough fabric to cut a bias strip of 10" x 1". The handle must be cut on the bias because it will formed into a half circle. The fabric needs to be able to stretch into shape. Cut out the basket applique piece. Remove the paper backing.
Lay down the basket block background fabric, right side up (I used a 9.5" square of white with gold flowers).

Cut the handle on the bias (45" from straight of grain). The handle should be 10" x 1".
Press under the two long edges of the handle, about 1/4".
Draw a 6" circle.
Place the fabric applique on the background fabric so that approximately 1.25" is under the basket. Place the circle so that the center is at the top of the basket. Using the circle as a guide, pin the handle onto the background fabric. You will need to gently guide the handle around to form a circle. Place a pin or other mark on the side of the block so you will know where the top of the basket should be.
4. Stitch Handle & Fuse Basket
Remove the circle pattern and basket. Hand stitch the basket handle into place, using tiny stitches.

5. Finish Basket Block

Remove the paper backing from the basket and heart if you have not done so already. Place the basket applique on over the handle ends. Using an iron, fuse into place. Fuse the heart into place.
Your basket block is now completed.

Use this basket block in our Happy Day Applique wall hanging.
Tips From The Workroom & Trails


Our most popular Christmas decor projects.