Quick & Easy Gift Bag
This pattern comes from our former site, CraftAndFabricLinks. Same owners - new site.
Disclosure: This site contains affiliate links. As an Amazon Associate, I earn from qualifying purchases. Clicking on links, and purchasing products, may result in the seller paying us compensation - at no extra cost to you. Affiliate links are in green.
Great “beginner” sewing project. Practice straight stitching.
Also see:
Articles & Tips
Easy Sewing Patterns
Makeovers For Organizing
Special Occasion Projects
Super Easy Gift Bag Pattern
Stitch the seams, hem the top, attach ribbon in the back. Then just tie the ribbon into a pretty bow, and you have a beautiful gift bag! Sizes small, medium and large.
These bags do NOT require a casing for the ribbon. The bag is stitched together and hemmed. Then you simply attach the ribbon to the outside of the bag (sewn onto the back of the bag). That's it!
You can add your own trimmings and create your own look. These make wonderful gifts themselves, or use them to present your gifts in. I have made several of both types of bag, and they have been passed through the family numerous times as they are used to "wrap" gifts.
Bag Sizes
Not including the hemmed area above the ribbon, the bag sizes are as follows
Small: 9" x 9"
Medium: 9" wide x 12" tall
Large: 9" wide x 15" tall
Cutting Tools
I recommend using a Rotary Cutter, Cutting Mat , and Sewing Ruler. I use these tools for most projects. They allow for easy, precise cutting.
Supplies
Project Supplies
Small Bag: 1 yard of 45" fabric will make 3 small bags.
Medium Bag: 1.25 yards of 45" fabric will make 3 medium bags.
Large: 9" wide x 15" tall
Thread (to match background or ribbon - it really won't show under the ribbon so thread color is not too important)
1.5 yards of Ribbon per bag (for ties)
Optional: Ribbon, lace, etc. for trim
General Sewing Supplies
thread
sewing scissors
quilting pins
large sewing ruler
fabric marking pencils
seam ripper
rotary cutter and mat (optional but nice)
PRE-WASH, DRY, & PRESS ALL FABRIC BEFORE USING
DIRECTIONS
NOTE: All seams 1/4"
1. Cut Pattern Pieces
If you prefer, you can cut the fabric to the following sizes, omitting a paper pattern.
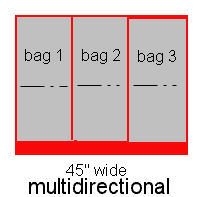
For multi-directional fabric:
Small Bag: Cut 1 piece 13.5" x 34.5"
Medium Bag: Cut 1 piece 13.5" x 40.5" (or cut it 13.5" x w.o.f. for a slightly larger bag - w.o.f means width of fabric)
Large Bag: Cut 1 piece 13.5" x 46.5 OR 2 pieces, each 13.5" x 23.5"
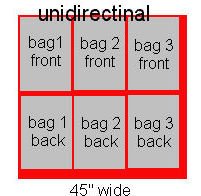
For unidirectional fabric (pattern lies in one direction with the grain)
Small Bag: cut 2 pieces, each 13.5" x 17.5"; label one FRONT and one BACK Medium Bag: Cut 2 pieces, each 13.5" x 20.5"; label one FRONT and one BACK
Large Bag: Cut 2 pieces, each 13.5" x 23.5"; label one FRONT and one BACK
Now, lay-out pattern pieces as shown below. Use "multidirectional" for fabric that has a pattern that runs all directions. Use "unidirectional" for fabric that has a pattern that runs with the grain. Otherwise, the pattern will be right side up on one side of the bag and upside down on the other side.
2. Finish Fabric Edges (optional)
NOTE: serging the seams omits this step.
Zig-zag long sides of all pieces (if serging, omit this step).
3. Stitch Side Seams
For the unidirectional bags: Fold each bag right sides together, across the fold line. Stitch 1/4" sideseams.
For multidirectional bags: Stitch the front to the back, right sides together, along each side and across the bottom.
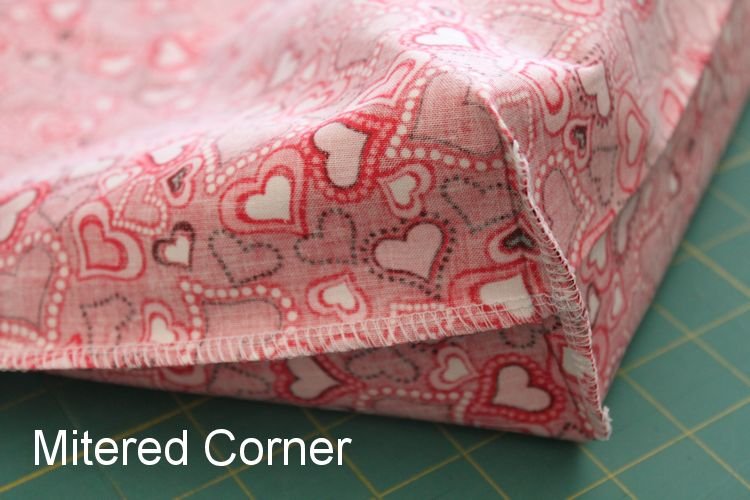
4. Create Mitered Corners
For directions on making mitered corners on the bottom of the bag, go to: Jumper Cable Bag. Refer to steps 6 and 7. Draw a 1.5" square for this bag.
5. Stitch Top Hem
Fold under the top edge of the bag 1/4", all the way around; press. Fold under another 3"; (4" on large bag). Press. Stitch hem.
6. Attach Ribbon
Turn bag right side out.
Lay the bag so that the back is face up. Mark the bag in the center, on the hem stitch line. Mark center of ribbon length. Pin the ribbon to the bag, matching centers. Pin the ribbon so that its upper edge covers the stitch line on the bag. Stitch a vertical line across the ribbon, to hold it to the bag. Stitch again, to be sure you have a strong line of stitching.
Note: As an alternate to machine stitching, you can hand stitch the ribbon to the bag, or use fabric glue to attach the ribbon.
7. Tie The Ribbon
Tie the ribbon around the bag. You can easily re-use this bag many times. Simply tie and untie. The ribbon is securely sewn, so it won't get lost from the bag.
Tie knots in the ends of the ribbon to keep it from ravelling.
Optional Trim: Add buttons, applique, bows etc.
More Accessory Patterns


Follow Our Adventures!


Use double sided pre-quilted fabric to create this roomy tote with pockets. Multi-use bag.