|
|
|
|
| HOME SEW CRAFTS DECOR SHOP |
|
WOOD WELCOME PUMPKIN
Painted Wood Pumpkin |
| lessons holiday patterns craft patterns |

|
Embellished With Ribbon
painted wood pumpkinharvest, Halloween or ThanksgivingAlso see: Wood Projects |
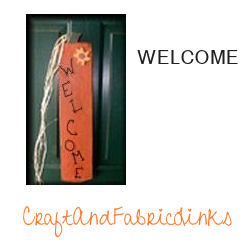
Country PumpkinWelcome guests to your home with this "country pumpkin". Perfect size for your front door. Make a wood pumpkin for your yard as well (see link below).
Also see:
|
Outdoor Use / Pattern SizeThe pattern as is creates a pumpkin approximately 25" long by 5.5" wide. If you wish to change the size of this pumpkin:
|
Use As AppliquePrint the pattern (click pdf listed under supplies), then draw the outlines of the various turkey pieces. For directions on layering pieces using an applique sheet, go to: turkey applique tutorial |
SuppliesExterior Use: For Use In Yard3/8" Plywood (sheet size depends on the size you plan to make your pumpkin - 1/4" plywood would be ok if you are making a smaller pumpkin, such as 2 feet long or smaller) Paint the back of the piece with 2 coats of any exterior paint or varethane. Interior Use (or protected outdoor area such as front door with covered porch)
Wood
Paints Other Supplies
Sand Paper: Medium to fine grit Black painter's pen for writing "welcome" on sign Pumpkin pattern page 1
Our pattern pages fit onto a 8/5" x 11" pieces of paper and download as pdf files. If you need instructions on using pdf files, go to PDF Instructions. |
Directions1. Cut out all pieces. 2. Paint pieces; let dry thoroughly 3. Sand edges heavily to give a well worn appearance. 4. Stain all pieces using Minwax Provencial Stain. 5. Glue center of flower onto flower; glue flower onto pumpkin. 6. Drill holes where indicated at each "X", using a small drill bit. 7. Add rusty wire through holes and twist the wire in front to secure. 8. Add raffia to wire. Mount your new pumpkin on a fence, post, or stake. Happy Fall! |
Quick Reference |
Learn To Paint!free video tutorialsVisit my youtube channel. Free videos with step by step instructions. Create beautiful paintings for you home. |

Please ShareI rely on advertising to keep my site free. Please share with friends. |
Privacy Policy & Terms Of UseBy using our website, you expressly consent to our Privacy Policy and Terms & Conditions. All Patterns, images and instructions are copyright protected. |