Non-Slip Chair Cushion
sewing -> cushions/pillows -> pets
inner cushion with removable cover
Non-slip fabric: Learn to sew with non-slip fabric. Perfect for cat or small dog. Adds comfort to hard surface chairs.
This pattern was first posted on our previous site, CraftAndFabricLinks.com.
Disclosure: This site contains affiliate links. As an Amazon Associate, I earn from qualifying purchases. Clicking on links, and purchasing products, may result in the seller paying us compensation - at no extra cost to you. Affiliate links are in green.
Also see:
Tips & Articles
Home Improvement
Quilt Patterns
Animal & Pet Theme
Free Craft Projects
Non-Slip Chair Pad

Super easy! No zippers or buttons. Easy-open back side for removal of inner cushion when laundering the cover is needed.
Place the covered cushion over a sofa or chair. Perfect for hard surface chairs, or to keep your furniture clean from pet fur.
Non-slip fabric bottom helps hold the cushion in place on the chair.
The first sections illustrates how to make the inner cushion. The second section teaches how to make the outer cover, using non-slip fabric. Keep fur off your furniture with this easy to make pillow & cover set. Envelope back opening allows for easy removal of interior cushion. This one pattern creates the inside cushion or pillow, as well as the cover.
For pet beds: round the corners as needed, covered cushion will fit nicely into oval or round pet beds.
I love using non-slip fabric: learn this new skill while making this versatile cushion and cover.
Item Size
Fits typical chair as shown. Adjust size to your needs.
All seams are 1/4”
Pre-wash, dry & press fabric before using
GENERAL SUPPLIES
Your fabric will shrink, so pre-wash, dry and press before using if you plan to wash your project in the future.
Iron between each step. Read through all directions completely before beginning.
Cutting Tools
I recommend the following tools for cutting. I use these tools for most projects. They allow for easy, precise cutting.
rotary cutter
cutting mat
large sewing ruler
Other Sewing Supplies
thread to match fabric background
sewing scissors
pins (I use quilting pins)
pencil or pen
PROJECT SUPPLIES
Fabric
one 13” x 17” piece of fabric for cushion cover top (I used multi color floral)
1/2 yard non-slip fabric for underside of cushion (you need two 9” x 14” pieces)
1/2 yard fabric for inner cushion cover (or two 13” x 17” pieces of fabric)
one 12” x 17” x 1” piece of foam for inner cushion (or you can use stuffing to create a pillow)
Pattern Pieces: see “Directions” below.
DIRECTIONS
Remember: all seams are 1/4”; iron after each step. Read through all directions completely before beginning.
Our patterns download as pdf files. You will need the inner pillow pattern, the outer cover top, and the outer cover back (bottom of cover).
Print and make copies as instructed.
NOTE: The pattern pieces say “pillow” - this pattern creates a pillow if stuffed, and a pad or cushion if foam is used.
inner cushion pattern
print 4 copies of the pattern
outer cover TOP pattern
print 4 copies of the pattern
outer cover BACK (bottom of cushion) pattern
print 2 copies of the pattern
NOTE: The outer cover pattern is just slightly larger than the inside cushion pattern. This gives just a bit of extra room, allowing the outer covering to slip over the inner cushion more easily. You will add 2.5” extension to the straight edge of the BACK outer covering to create the hemmed areas. This creates an opening on the back side of the cushion. The extension piece is made from non-slip fabric.
MAKE INNER CUSHION
Cut out the four inner cushion pieces. Lay out the four pattern pieces as shown below (you will need to turn over two of the pieces to be mirror opposites). Line up the straight edges and tape all four pieces along the straight edges. You have now created the inner cushion pattern.

Fold your fabric in half so that it measures 1/2 yard x 45”. Place the inner cushion pattern on the folded fabric and cut through BOTH layers, creating two pieces of oval fabric.

Stitch the pillow fabric pieces right sides together, using 1/4” seam, all the way around, leaving a 5” area open for turning. Turn right side out.

Add stuffing if creating a pillow. Cut and insert foam if creating a chair pad or cushion.
For foam: cut a 12” x 17” x 1” piece of foam. I used a pen to make marks where I needed to cut the foam, then rounded the corners and trimmed the sides, using my regular sewing scissors. Refer to the photo below.

After inserting the stuffing or foam, slip stitch the opening closed.
Your inner chair pad cushion is now completed.

CREATE REMOVABLE CHAIR PAD COVER
The cover is made in three pieces; the top is one piece, and the back is two pieces that overlap. Each back piece is made from non-slip fabric.
Chair Pad Cover Top - 1 piece
Just as you did with the inner cushion, print 4 pieces of the cover top pattern. Tape together to create an oval cover top pattern.
Using your COVER TOP PATTERN, cut one cover piece from cover fabric (you only need one top piece, so cut only through one layer of fabric). I used decorative floral fabric. Set aside.
Fabric With Nap Or Directional Print: I placed my fabric over the inner cushion to decide approximate placement of flowers on the outer fabric (I wanted them spaced in a particular way). If your fabric has nap (directional texture or pattern), you should check placement before cutting the fabric.

Chair Pad Cover Back - 2 pieces plus extension pieces
Lay out the 2 cover back pattern pieces and tape them together along the long side. Cut another pattern piece that measures 2.5” (2 1/5”) x the width of your back pattern piece. This additional strip is the extension piece. The main part of the back will be made from non-slip fabric. The extension piece is cut from regular fabric. This keeps down bulk where the cushion cover back overlaps in the center back.
Do NOT tape the extension pieces to the main back piece.

Using the pillow cover back pattern, cut two pieces from non-slip fabric.

The non-slip fabric has small, non-skid dots on one side (that is the right side). It can be cut with regular sewing shears.

Using the extension pattern piece, cut two extension pieces from regular fabric (I used my inner cushion fabric). Do NOT use non-slip fabric for the extension pieces.
Stitch an extension piece to each back piece, along the long straight edge, right sides together (dots are on RIGHT SIDE). Press seam open.
NOTE: I kept my iron mostly over the regular fabric.

Press under the long, raw edge of the extension piece 1/4” to create a hemmed edge. Stitch the hem, using a straight stitch.
NOTE: The non-slip fabric will NOT slide under your presser foot (the point of using non-slip fabric is that it doesn’t slide). Turn the fabric so that the dots are face UP. The back side of the non-slip fabric will slide just fine.

Lay the top cover piece on your working surface, right side up. Lay one back piece over the top piece, right side down, aligning the rounded ends. Stitch the two layers together, using a 1/4” seam, around the end and two sides.
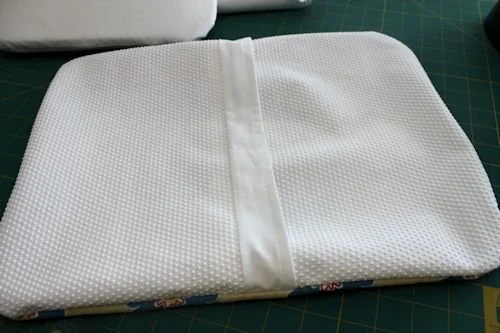
The following photo shows the first back piece in stitched into place.

Place the second back piece over the two pieces on the opposite end, right side down, aligning the opposite rounded ends. Stitch around the end and two sides.
NOTE: the two back pieces should overlap about 2” in the center.
Turn right side out, using the back opening. Place pillow or pad (cushion) inside.
She loves it!


More Animal & Pet Projects
Don’t toss the cat tree - replace the rope!

Make an adorable cat pillow for baby’s room.
Pet Projects


Easily replace the rope on a cat tree. Don't toss the tree - replace the rope.