|
|
|
|
| HOME SEW CRAFTS DECOR SHOP |
|
OHIO STAR QUILT BLOCK
Sewing Pattern |
| lessons holiday patterns sewing patterns |
Embellished With Ribbon
Matt And Shari ProjectProject donated by MattAndShari.com finished block measures 12 " x 12 " (plus seam allowance) Also see: Quilt Patterns |
|
Page 1 of 2 Go To Page 2 |
MattAndShari.comThis project was designed by Matt and Shari of mattandshari.com and is printed here with their permission. This article is copyright protected by mattandshari.com and is provided for your personal use only. Do not copy without permission. mattandshari.com is for "real people" who are looking for "real projects" to enhance their homes and their lives. Matt and Shari are excellent teachers and they lend their expertise to how-to projects, articles and videos that cover decorating, sewing, crafts, shop projects, kids & family and even food. It's a site to reference for everything that's going on in your life today! All patterns, images and text © Christina Sherrod of CraftAndFabricLinks.com unless otherwise noted. |
Item Size12.5" x 12.5" (including 1/4" seam allowances) |
Ohio Square Quilt Block
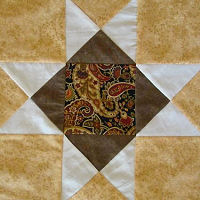
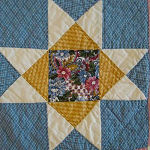
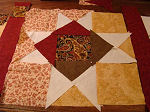
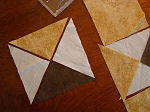
So let’s look into the make-up of the Ohio Star pattern. Just as the Patience Corner was a four patch block, with each patch being made up of 3 pieces, the Ohio Start is also a block made up of patches. The Ohio Square is a nine patch, with 5 of the patches being a simple square of fabric and 4 of the patches' squares made up of four triangles each. I noticed that my original Ohio Star used four of the same squares but added an accent in the center. Of all of the blocks I made in the past, I was happiest with the Ohio Star. So, I copied my fabric pattern as you can see above. However, many other options are available. Note from CraftAndFabricLinks.com: Visit MattAndShari.com to see the other quilt blocks in this series. |
 The Ohio Star quilt block is our second in our series of 6 to create a quilted wall hanging for our homes. We, as a group, are going to spend the year quilting together and at the end I hope we will all share our results!
Supplies
5 – 4 1/2" squares (includes 1/4" seam allowance all the way around)
Recommended by CraftAndFabricLinks: seam ripper, sewing thread scissors (small, sharp scissors made for trimming thread), large sewing ruler, rotary cutter and mat, and decorative thread for topstiching (optional). |
Instructionsuse 1/4" seam allowanceIron between each step. Read through all directions completely before beginning.
|
 1) Begin by cutting out the plastic templates for the square and triangle. Download and print the template I’ve made checking to be sure your square measures
4 1/2" on all sides. Remember, the templates include 1/4" seam allowance all the way around the piece.
1) Begin by cutting out the plastic templates for the square and triangle. Download and print the template I’ve made checking to be sure your square measures
4 1/2" on all sides. Remember, the templates include 1/4" seam allowance all the way around the piece.
|
2) Place the plastic template on the wrong side of your fabric, trace around it with a sharp pencil or white pencil on dark fabrics. Then, cut out your pieces. |
|
|
 3) Work with your fabrics to determine which block pieces will be in which colors. You may have to replace pieces with another color even after you have them all cut out. Save the ones you’ve cut and replaced. They may work in another quilt block.
|
|
 4) Once you are sure about your color choices and their locations, it’s time to put the four squares together that are made up of 4 triangles each. It’s always best to sew the smallest pieces together first and then join them with the larger or longer ones.
|
|
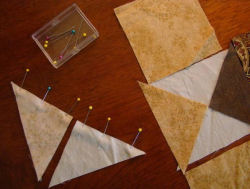 5) So start by pinning two of the four neighboring triangles together.
|
|
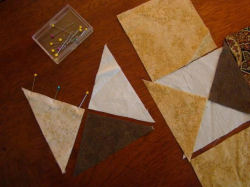 6) Pin the remaining two together.
|
Page 1 of 2 Go To Page 2 |
Quick Reference |
Learn To Paint!free video tutorialsVisit my youtube channel. Free videos with step by step instructions. Paint beautiful paintings for your home. |

Please ShareI rely on advertising to keep my site free. Please share with friends. |
Privacy Policy & Terms Of UseBy using our website, you expressly consent to our Privacy Policy and Terms & Conditions. All Patterns, images and instructions are copyright protected. |