Pajama Pant Create Pattern
Pajama Pant Series
Lesson 1: Create A Custom Pattern Based On Your Measurements
- then alter to customize

Disclosure: This site contains affiliate links. As an Amazon Associate, I earn from qualifying purchases. Clicking on links, and purchasing products, may result in the seller paying us compensation - at no extra cost to you. Affiliate links are in green.
Also see:
Follow Our Adventures
Easy Sewing Patterns
Clothing Patterns
Decor Projects
Create A Pattern That Fits!
For this lesson, you will need your measurements (as listed below in directions), and paper to draw a pattern onto. I always have a roll of butcher paper on hand for pattern making. It is economical and easy to use.
Learn how to create your own pattern that fits! By using your own measurements to draw a pattern, you will have a custom pattern that fits! Alter your "master pattern" to create crop pants, flare leg, low waist, high waist, larger or small waist or hip, ankle length, or shorts. Alter any way you wish! Easily change the size of the pattern. Add borders, a drawstring, embroidery or other details to make them uniquely yours.
Use this same pattern to create nice-flowing comfy casual or dress pants (such as from rayon or rayon-polyester).
We will teach you TWO methods for creating your own custom pattern, then teach you how to sew your fabulous new pants.
Lesson 1: Take measurements and draw a pattern based on measurements.
Lesson 2: Take an existing pair of pajama pants and turn them into a custom pattern.
Lesson 3: Sew your new pants!
Lesson 4: Add an adorable cuff to capri or full length pants.
Step by step, fully illustrated instructions.
Go to our free sewing book - currently still on our CraftAndFabricLinks site - to learn how to add pockets. We will be adding our free sewing book to this site eventually. Go to Sewing Lessons for more free lessons. Your new pattern can be turned into an entire wardrobe of pants and pajama pant patterns!
Pant Pattern Basic Information
A pair of pants is generally made with a center seam down the front, a center seam down the back, a side seam on each outer side and an inside seam (inseam) on the inside of each leg. That is how our pants will be constructed, so our pattern will be created in this style. The back waistline comes up a bit higher than the front. This creates a good fit and is why I make my own pj's. Store-bought pj's often cut the back too low and this creates a problem when bending over ("plumber pants"). When you make your own pattern, you can cut the front lower (low slung look) and the back higher for a nice fit. If you want both front and back lower - or higher, that is fine too - it's your choice. Customize the fit to your own taste. That’s the beauty of creating your own pattern.
Take Measurements
You need 4 main measurements to make a pajama pants pattern: waist, hip, inseam, crotch length and thigh. Take the measurements as described below and write down each one.
Waist: Measure your natural waist or measure around the area where you want your pant waist to be (usually a bit under the real waist).
Hip: Measure around the fullest part of the hip.
Inseam: Measure from the crotch to the inside of the ankle - or to where you want the pant leg to come to (ankle, mid calf if capri length, on floor etc.)
Crotch Length: Measure from center back waist, between legs, to center front waist - to be sure your pattern will come up high enough on the waist and allow room for your "seat" and "belly".
Thigh: Measure around the fullest part.
Draw A Pattern Using Your Measurements
I draw my patterns on butcher paper, bought on a roll.
Create your pattern. Following the pattern example below, draw your pattern. See "altering your pattern" below for more instruction. You will need two pattern pieces: front and back. These pattern pieces will placed on a folded piece of fabric. When the fabric is cut, you will have two opposite fronts and two opposite backs (a right and left leg for front, and a right and left leg for back).
Refer to "Altering" below for directions on making changes to our basic pattern, to create a custom fit for you.
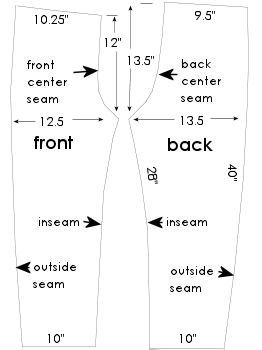
NOTE: The front and back will sewn together at the inseam and outer seam; therefore, these measurements MUST BE EQUAL. In my example, the outer seam of BOTH the front and back measure 40". The inseams measure 28". The back center seam measures 13.5" (vertically) and the front center seam measures 12" (vertically). As stated above, the back center seam rides higher at the waist. The curve of the back center seam is more pronounced than that of the front. It goes from 9.5" at the top point to 13.5" at the crotch point - a difference of 4". The front center seam curve is only 2.25". This allows for the curve around the buttocks. It also makes the pant waist come IN at the small of the back, creating a nice fit.
Custom Drawn Pajama Pants Pattern
Add Seam Allowances, Hem & Waistband
Add 1.25" hem on each leg length (for a 1" hem) and 1.25" at the top for a 1" waistband (for elastic casing). All seams are 1/4 inch.
Go to Lesson 2 to learn how to learn how to draw new lines around your pattern to allow for the hem, waistband, and seam allowances.
Alter Your Pants Pattern As Needed
This pattern fits a size 8-10, or hips: 39"; waist 29"; thigh 21"; inseam 27". Using my drawing as a guide, draw your pattern. Use the same general shape as my pattern pieces; just add or delete from the size as needed.
The person I made this pattern for had a thigh measurement of 21". This pattern will create a pant leg of 25" around the fullest part at the top of the leg. This allows for some extra room in the leg. The front pattern measures 12.5" across the widest part of the top of the leg and the back pattern measures 13.5" across. 1/2" is used for the two seam allowances (each side's seam allowance is 1/4"), so the finished measurement will be 12+13=25".
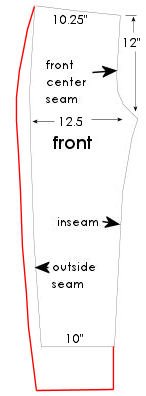
Let's say you need a finished inseam of 33" (6" longer than our pattern) and your thigh measures 25" (4" larger than our model). You will need to add 2" to both the front and back pattern at the area of the thigh and 6" to the inseam. Your finished pattern will have an inseam of 33" plus 1.25" for hem and .25" for seam allowance at top of leg - total inseam on pattern equals 34.5". Note that the hem width remains the same (10").
The pattern below left shows an altered FRONT pattern. It adds 2" to the outer seam and 6" to the overall length. The same will be done to the BACK pattern. The overall change will be 4" to the thigh circumference (2" front plus 2" back) and 6" to the length of the legs.
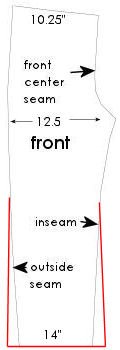
If you wish to change the shape of the leg, draw the new shape. For example, if you wish to have flare legs that are 4" wider at the bottom, simple add 2" to the outsides of both the front and back pattern pieces as shown below right. To keep the flare even, I added 2" to both the inseam side and the outer seam side. Doing this to both the front and back piece would add a total of 8" to the bottom circumference of the leg.
Remember that the outside seam and the inseam MUST be equal between the front and back pieces. This is because the front and back pieces are stitched together at the inseam and the outer seam.
What if your crotch measurement is longer than our pattern? Our measurement is 14" along the curve of the front plus 15.5" along the curve of the back. We will turn down 1.25" for the elastic casing (both front and back) and we will lose 1/2" for the crotch seam. Our finished crotch measurement will be 26.5". Let's say your total crotch measurement is 30.5". Simply add 2" to the top edge of both the front and back pieces.
Article by: Christina Sherrod
Clothing Projects


Quilt & Pillow Sewing


Super easy scarf crochet pattern, using only double crochet. Back loop holds layers together.