Bear Paw Block
Disclosure: This site contains affiliate links. As an Amazon Associate, I earn from qualifying purchases. Clicking on links, and purchasing products, may result in the seller paying us compensation - at no extra cost to you. Affiliate links are in green.
Also see:
Follow Our Adventures
Remodel Projects
Quilt Patterns
Craft and Decor Projects
Sewing With Points
Familiarize yourself with sewing "points" before making this block (two triangles stitched together create the points). It is not difficult to create this block once you learn how to make "perfect points". Notice that the sharp ends of the points come to the edges of the finished block (when the blocks are sewn to connecting fabric pieces).
Visit our Free Quilt Lessons - points for more information.
Bear Paw Block Size
The block will measure 14.5" x 14.5" when finished. When stitched to other fabric pieces, the block will measure 14" x 14".
SUPPLIES - for one block
Quilt Fabric - I will refer to fabric I used
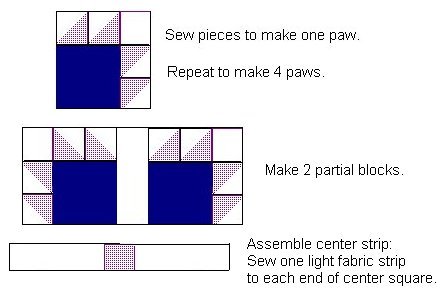
When all pieces are cut, they will be laid out like the photo below. You will have four paws (also called claws). They are all created the same, but rotated as shown in the photo at the top of the page.
Claws / Center Square(floral): Eight 3.5" squares plus 1 2.5" square. Quilt fabric comes about 42" wide, so you can cut all of these across the width of the fabric. You will only need 1/8 yard (1/8 yard is 4.5" so this allows for some shrinkage). One fat quarter would also work.
Paws(turqoise): Four 4.5" squares. One fat quarter would work, or 1/3 yard (this allows for a bit of shrinkage).
Background(gray): Four 6.5" x 2.5" strips, four 2.5" squares, and eight 3.5" squares. One fat quarter would work, or 1/3 yard (this allows for a bit of shrinkage).
Other
thread to match background of fabric
large sewing ruler, rotary cutter and mat (optional but a must-have for me)
scissors
pins
quilter's square (for squaring down)

Quilt Block Used For These Instructions
The turquoise squares make up the main paw. The floral creates the claws. Each paw consists of a main square and 4 points. Strips are stitched between 4 finished paws.
DIRECTIONS
Refer to images in steps 4 and 5 below.

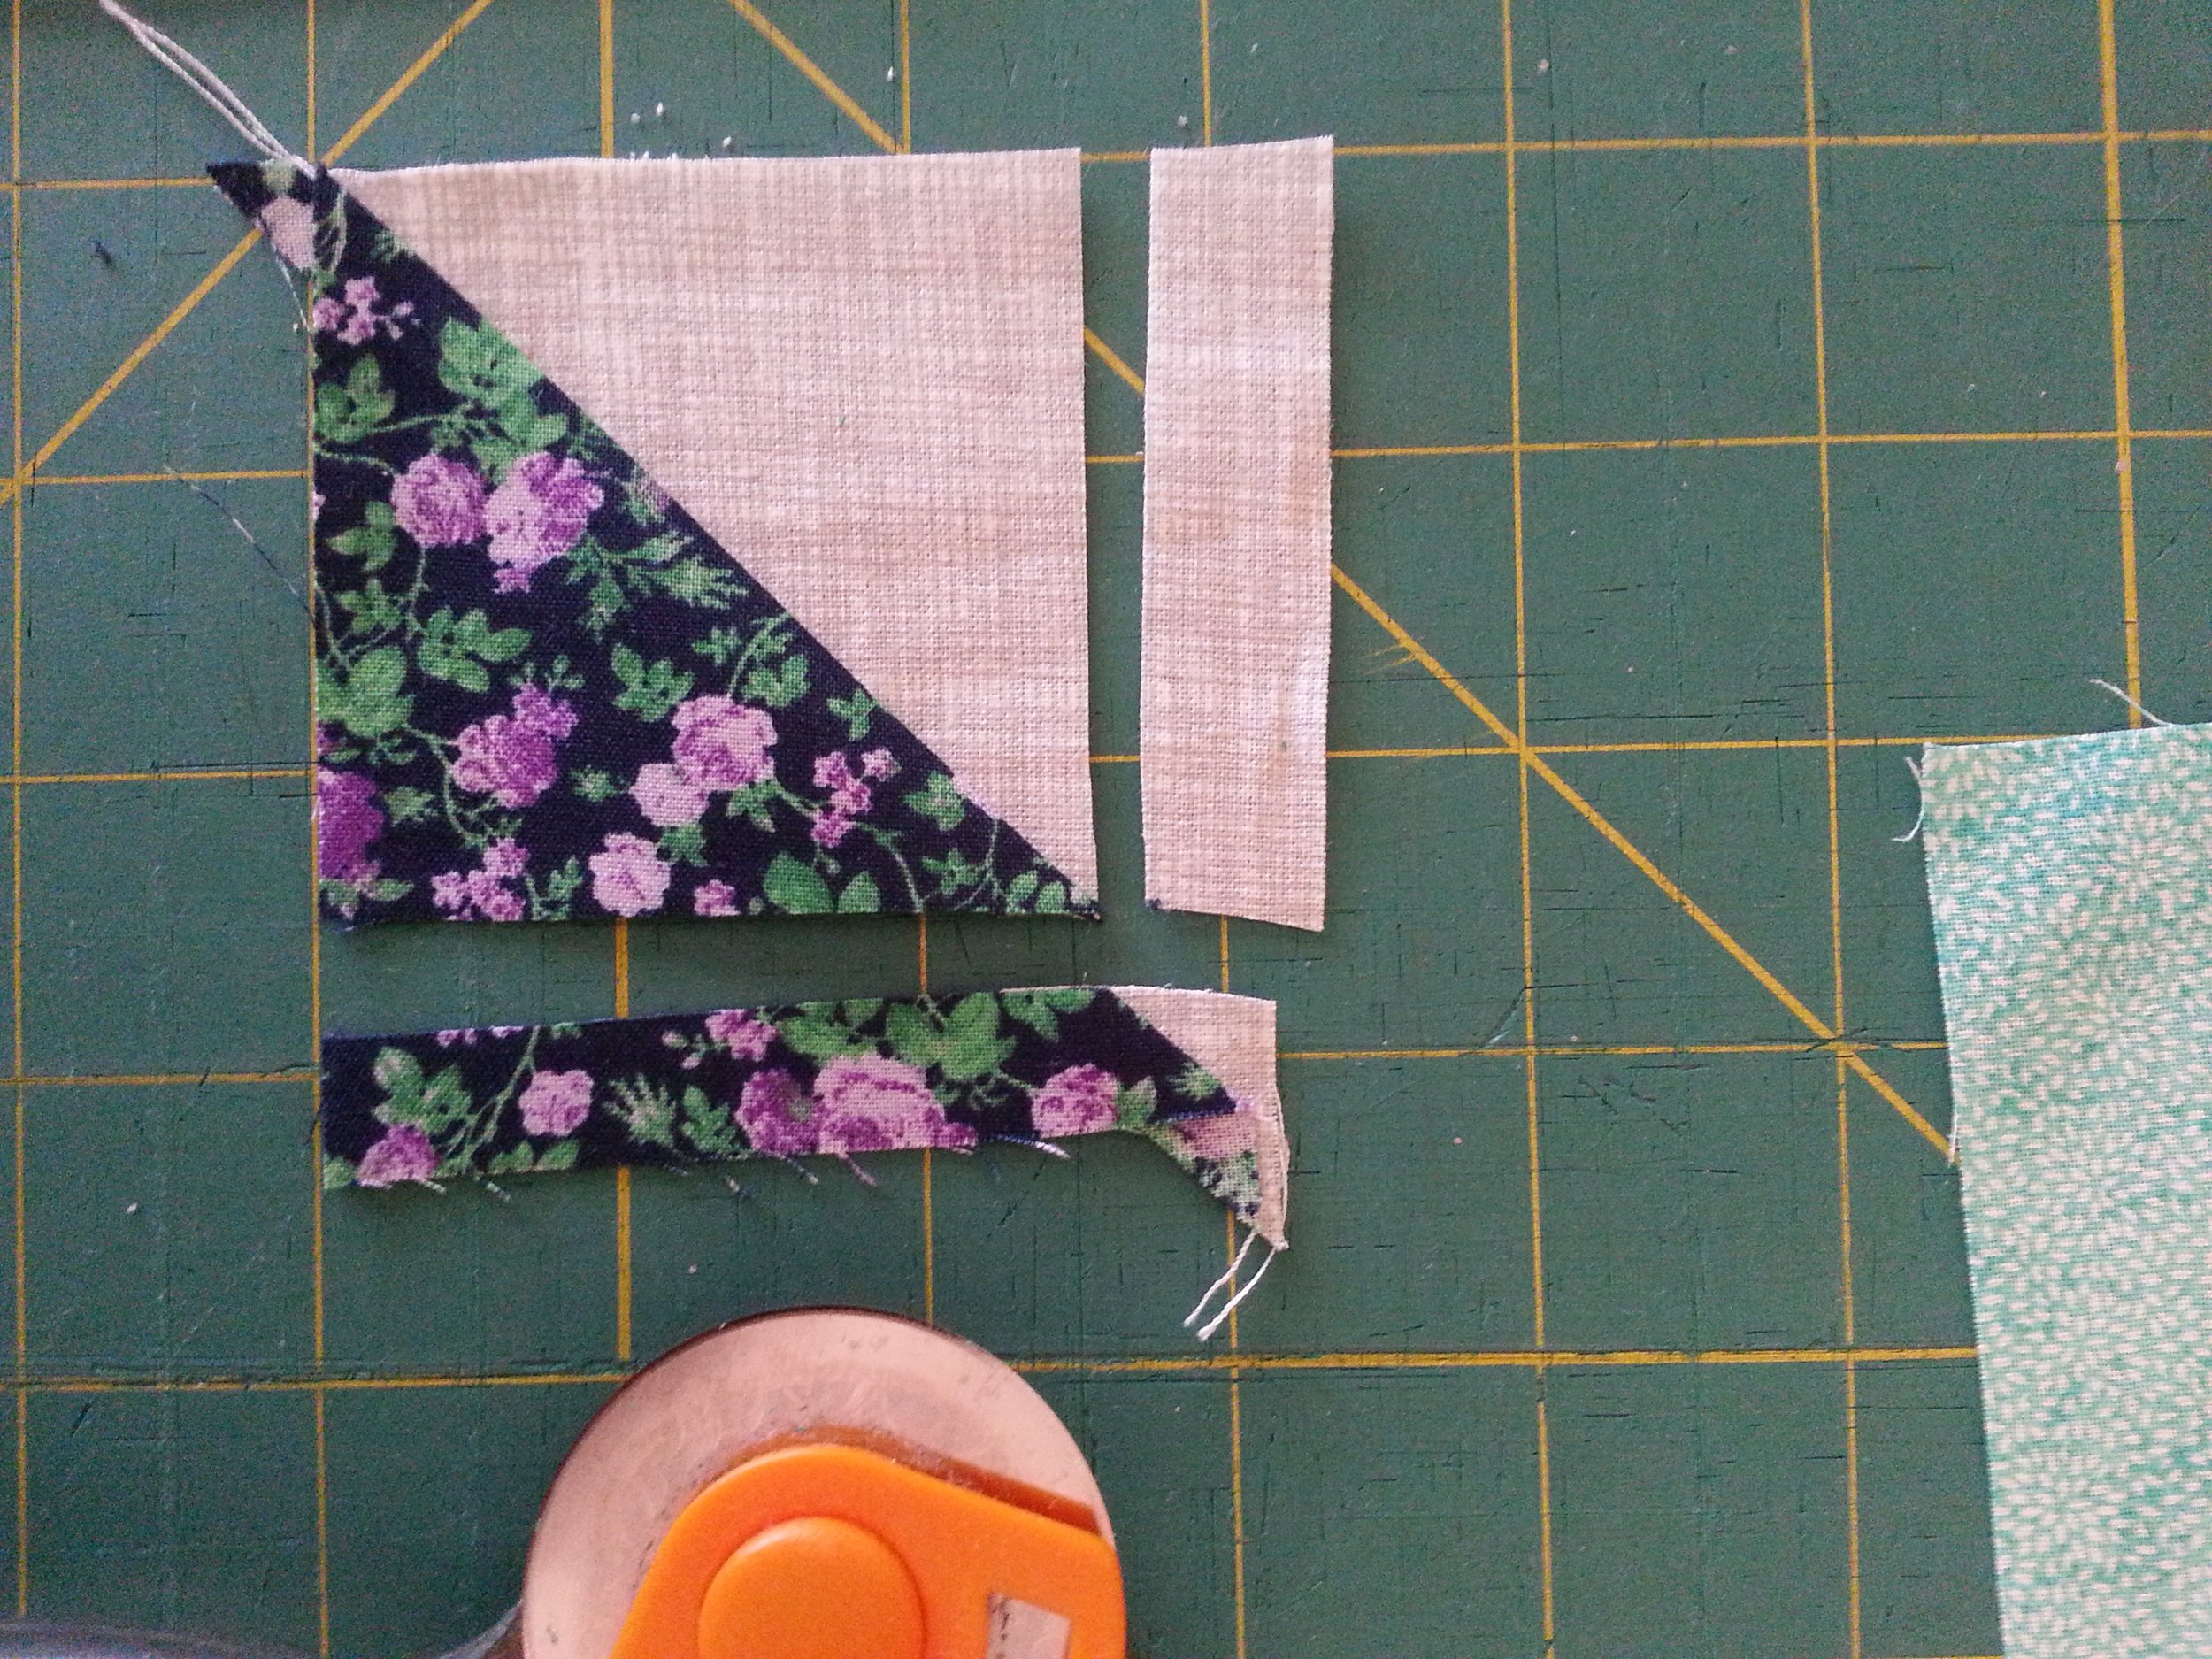
Cut 8 squares of dark fabric (I used floral), each measuring 3.5" x 3.5"; cut each square on the diagonal to create triangles. NOTE: cut half of squares on the diagonal from upper left corner to lower right corner and half of the squares from the lower left corner to the upper right corner (if your fabric is multi directional this is not important - cut all on the diagonal either way).
Cut 8 squares of light fabric (background fabric - gray in my sample), each measuring 3.5" x 3.5"; cut each square into triangles. NOTE: cut half of squares on the diagonal from upper left corner to lower right corner and half of the squares from the lower left corner to the upper right corner (if your fabric is multi directional this is not important - cut all on the diagonal either way).
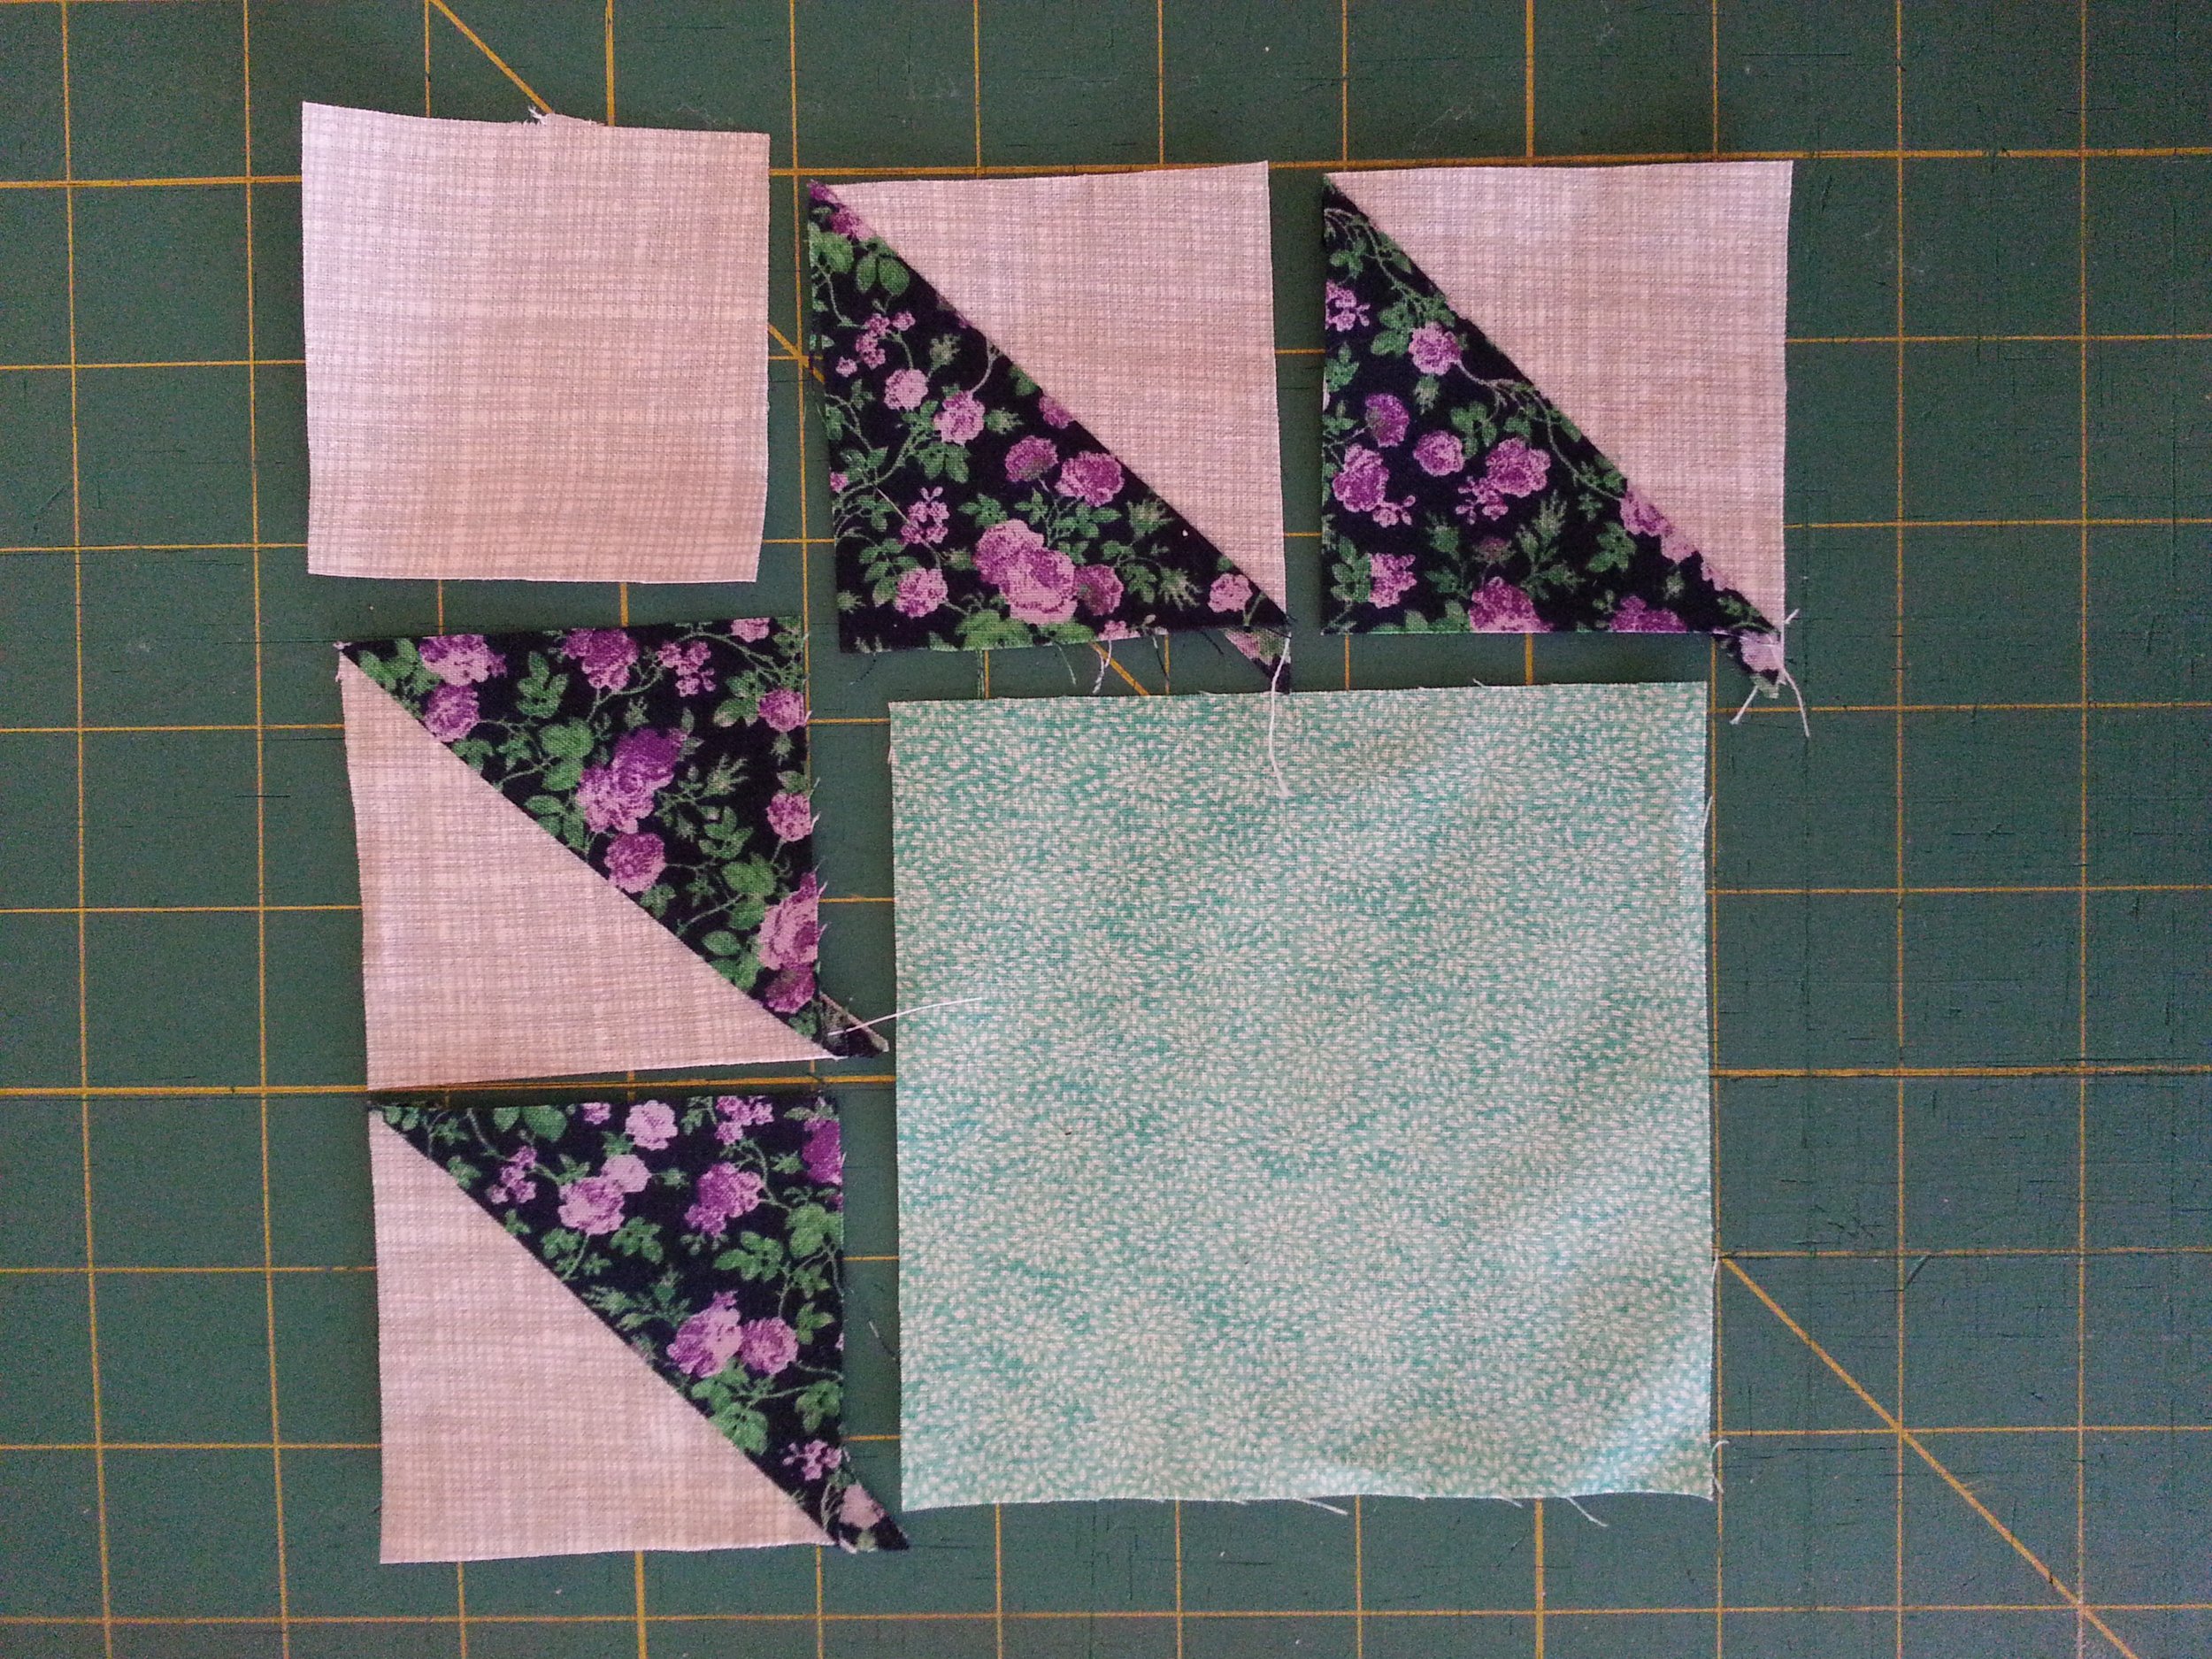
Stitch the triangle sets together to create eight squares.
Square down each stitched square to a 2.5" square. You will have sixteen 2.5" squares, divided on the diagonal. Refer to our Quilt Lessons - square down.
2. Cut Corner Squares & Center Squares
Cut 4 squares of light fabric (background fabric - gray in my sample), each measuring 2.5" x 2.5"
Cut 1 square of dark fabric (floral), measuring 2.5" x 2.5"
3. Cut Long Strips Between Each Paw
Cut 4 strips of light fabric (background fabric - gray in my sample), each measuring 6.5" x 2.5"
4. Cut Center Squares for Paws
Cut 4 square of contrast fabric (same or different fabric from points - I used turquoise), each measuring 4.5" x 4.5"
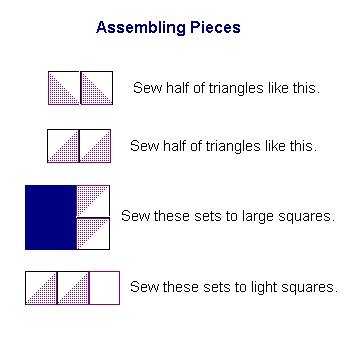
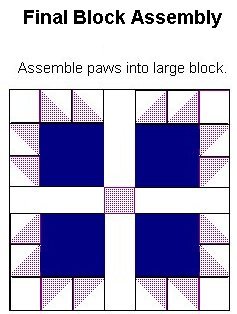
5. Assemble Quilt Block
Assemble pieces as shown below.
Article by: Christina Sherrod
PRESSING WITH IRON
I cannot stress enough the importance of pressing between every step. Use a steam iron if possible. The back of your piece should be as neat and tidy as the front of the piece. This way, there will not be bunching and added thickness when stitching all pieces together. Normally seams are pressed toward the darker fabric. I pressed all of my pieces so that the overall piece lay as flat as possible.
The following images show the front and back of my piece.
Different fabric colors and prints can dramatically change the tone and feeling of a quilt.

Press seams

Press front side
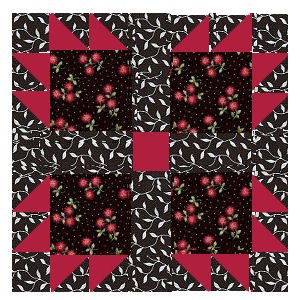
Different fabrics can create entirely different look.
Fabric Required For Queen Quilt (20 blocks)
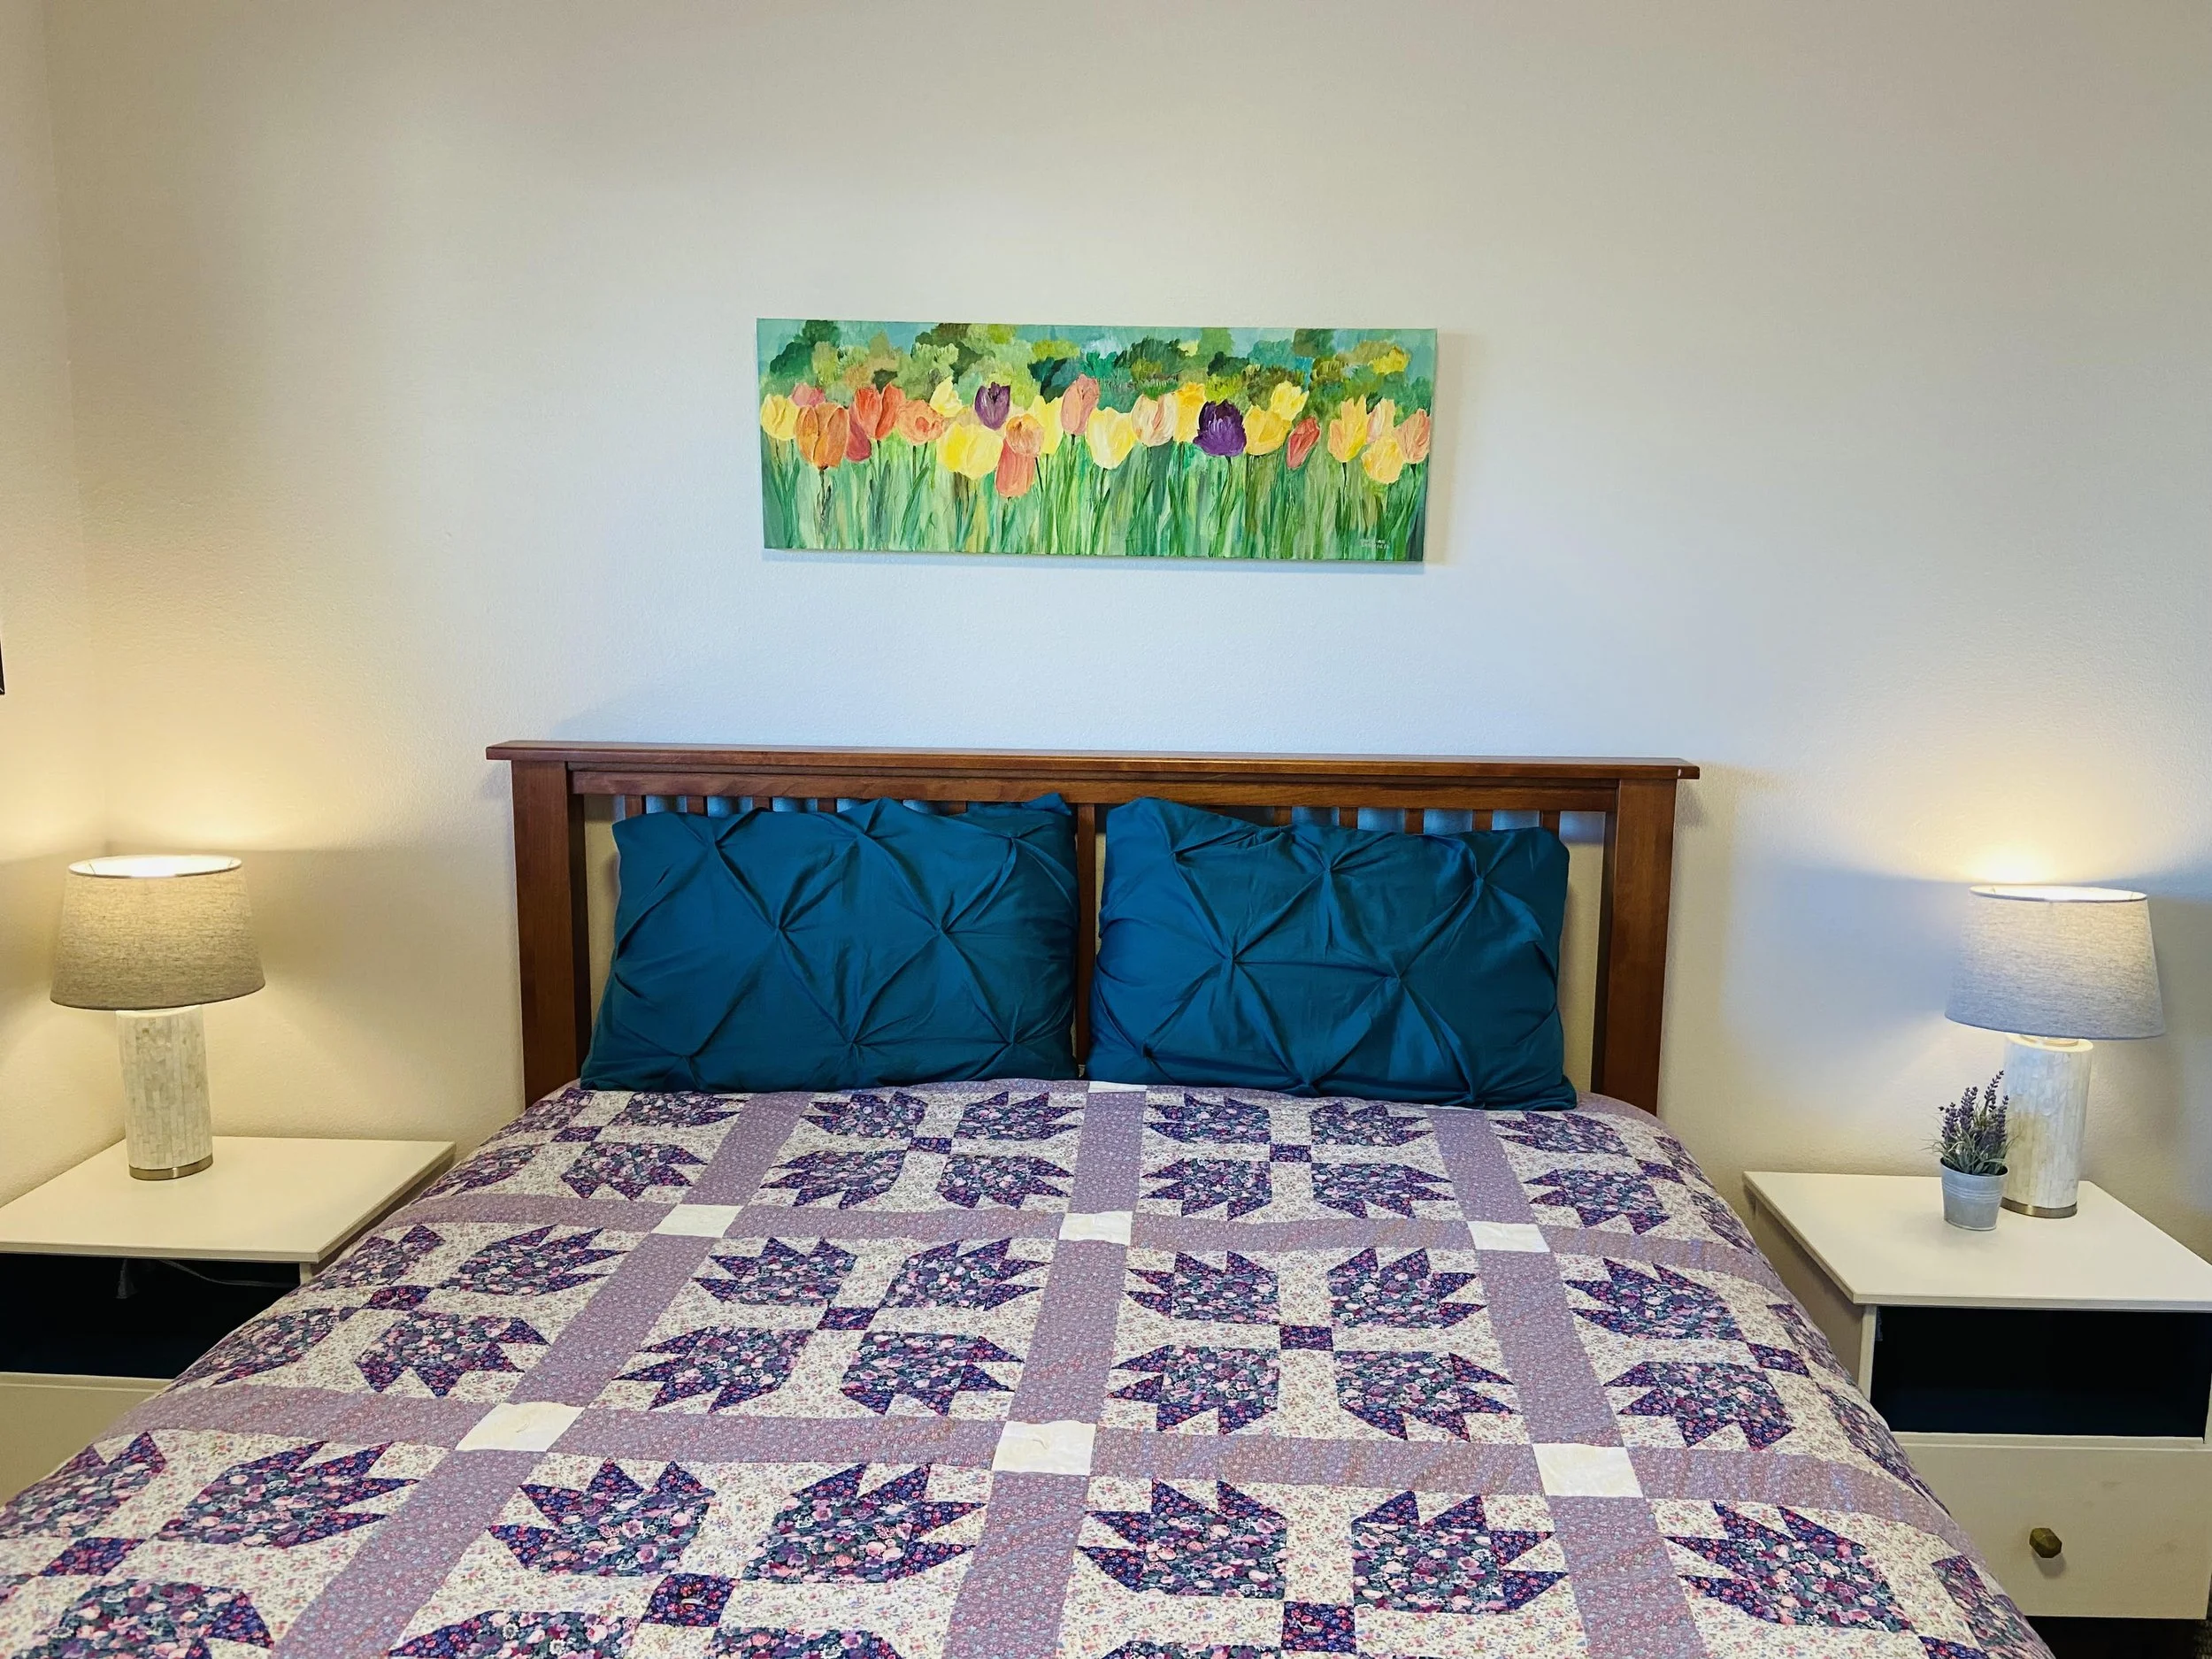
When choosing fabrics for a quilt, it helps to have a room’s decor / colors as samples, a plan for a holiday, or a mood that you are after. For the lavender quilt shown on this page, I wanted to bring in a sense of spring, and I love lavender. Lavender was my theme. I get this quilt out for the guest room every spring.


The fabric requirements listed are for making 20 blocks for a queen size quilt. Refer to the beginning of this article for a listing of block quantities needed for one block (such as for a pillow). 20 blocks plus borders and lattice will create a queen size quilt.
For quilts, the blocks are usually separated by strips of fabric (called sashing or lattice) in a pattern of your choice. You choose whether you will use sashing, what the width of the sashing will be, whether the sashing will be pieced into designs etc. Refer to the photo of a finished quilt. I made this queen size quilt using 20 blocks. I added borders on the sides, top and bottom. I also added white squares to my lattice.

NOTE: Fabric requirements are based on fabric width of at least 42". I have allowed a bit extra. Seams are all 1/4". The fabric will make 20 blocks.
Background Fabric:
3 yards: This covers four small 2.5" x 2.5" outer squares, four 6.5" x 2.5" strips, and background part of claw squares.
Fabric #2 :(Large 4.5" x 4.5" squares)
1.5 yards: This covers four small 2.5" x 2.5" outer squares, four 6.5" x 2.5" strips, and background part of claw squares.
Fabric #3 :(paw tips and small 2.5" center square)
1.75 yards
Cutting Instructions For Queen Quilt
Background Fabric
Claw background:
Cut 14 strips measuring 3.5" x w.o.f. (width of fabric). This means you will have 14 strips of fabric measuring 3.5" wide by about 44" long.
Cut the strips into 3.5" segments. You will a total of 160 3.5" x 3.5" squares (8 per block x 20 blocks).
Four small corner blocks:
Cut 4 strips measuring 2.5" x w.o.f. This means you will have 4 strips of fabric measuring 2.5" x about 44".
Cut the strips into 2.5" segments. You will need a total of 80 2.5" x 2.5" squares (4 per block x 20 blocks).
Four strips (strips that separate claws):
Cut 14 strips measuring 2.5" x w.o.f. This means you will have 14 strips of fabric measuring 2.5" x about 44".
Cut the strips into 2.5" segments. You will need a total of 80 2.5" x 2.5" squares (4 per block x 20 blocks).
Fabric #2: (large squares - also called paw squares)
Cut 9 strips of fabric measuring 4.5" x w.o.f. This means you will have 9 strips of fabric measuring 4.5" x about 44".
Cut each strip into 4.5" segments. You will need a total of 80 4.5" x 4.5" squares (4 per block x 20 blocks).
Fabric #3: (small center square and claw tips)
Cut 8 strips of fabric measuring 3.5" x w.o.f. This means you will have 8 strips of fabric measuring 3.5" x about 44".
Cut each strip into 3.5" segments. You will need a total of 160 3.5" x 3.5" squares (8 per block x 20 blocks).
Cut 2 strips of fabric measuring 2.5" x w.o.f. Cut these strips into 2.5" segments. You will need a total of 20 2.5" x 2.5" squares (1 per block x 20 bocks).
Quantity Of Blocks Needed For Quilts
Assumes you have borders and lattice:
Lap Size Quilt:
3 blocks x 4 blocks (i.e. make 12 blocks)
Queen Size Quilt:
4 blocks x 5 blocks (i.e. make 20 blocks)
King Size Quilt:
6 blocks x 6 blocks (i.e. make 36 blocks)
For quilts, the blocks are usually separated by strips of fabric in a pattern of your choice (you choose whether you will use sashing, what the width of the sashing will be, whether the sashing will be pieced into designs etc.). These strips are called sashing or lattice. Refer to the above photo of a finished quilt.

Quilt Sewing Projects


Adorable doll quilt or quilt block. Prairie girl enjoying her garden along with her dog.