| HOME SEW CRAFTS DECOR SHOP |
|
PURSE PATTERN Page 5
Outer Cell Phone Pocket |
| lessons holiday patterns sewing patterns |

|
-> sewing patterns -> accessories
|
Page 5: purse front With Cell Phone Pocket
DIRECTIONSNOTE: All seams 1/4" Create Purse Front
The finished purse front will measure 13.5" wide x 8.5" tall. |
1. Create Purse Front Center Piece With Zipper PocketThe cell phone pocket is the center segment of the purse front, and will be 4.5" wide by 6.5" tall. The segment runs the entire height of the purse, and we will place the zipper at a height of 6.5". Cut one piece of purse front contrast fabric measuring 5" wide by 7" high. Cut one piece of purse front pocket lining measuring 5" wide by 7" high. I used the same fabric for outer purse and lining. I used cream fabric for both exterior and lining.
|
|
Cut one purse front contrast fabric measuring 3" high x 5" wide. Cut one lining piece measuring 3" high x 5" wide. I used a gray print for both exterior and lining. Stitch to sides of zipper in the same way you did with the lower segment. Press. Baste the side edges together, close to the edge. |
|
Open the zipper so that the zipper pull is about half way between the two sides. Whip stitch the open end closed, close to the edge of the fabric. This will hold the zipper ends together while the purse front is being stitched together. |
|
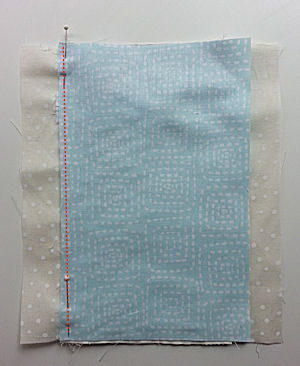
Cut a piece of pocket lining (to create back of pocket) larger than the pocket piece. It should be a bit taller and a couple inches or so wider. This allows room for error when stitching the entire piece together. Lay down the pocket back lining piece right side up. Lay down the pocket piece right side up over the back pocket lining piece. Pin. Stitch down the two sides, top and bottom, close to edge of the pocket piece, stitching over the previous batsing stitches. I enhanced the stitches in red in the photo. Trim off any excess lining at the top and bottom. I left some excess on the sides. Trim off the excess at the ends of the zipper. You now have a completed zippered pocket, fully lined. |
|
|
|
|
|
Your purse front is now complete, and should measure 13.5" wide x 8.5" high. |
Continue to page 6 to make the strap & finish your new purse |
|
Page 5: purse front
|
Quick Reference |
Learn To Paint!free video tutorialsVisit my youtube channel. Free videos with step by step instructions. Paint beautiful paintings for your home. |
Please ShareI rely on advertising to keep my site free. Please share with friends. |
Privacy Policy & Terms Of UseBy using our website, you expressly consent to our Privacy Policy and Terms & Conditions. All Patterns, images and instructions are copyright protected. |

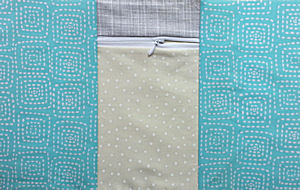 The front of the purse consists of three pieces: the outer two segments, and the middle segment that contains the cell phone zippered pocket. If you wish to omit the pocket, skip to "Make Purse Back". Make an extra purse back to use as the purse front.
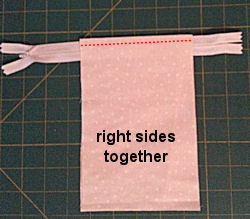 Lay down the lining piece, right side up. Lay the zipper over the lining (zipper closed and ends out of the way), right side up. Lay down the purse front fabric right side down. Align upper edges. Pin. Stitch close to the zipper coil, using a zipper foot.
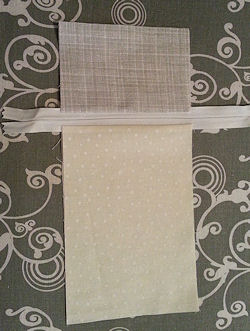 Open fabric pieces. Press. Baste the side edges together, close to the edge.
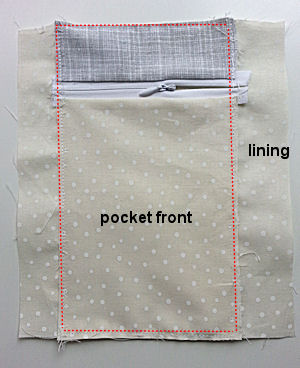 We made the pocket piece with excess height to allow for error. It must now be trimmed to a height of 8.5". If you want the zipper to be precisely 6.5" from the bottom of the purse (I did so it would fit my new phone), trim the lower part of the pocket piece so that the zipper is 6.75" from the lower edge (6.5" plus 1/4" seam allowance). Trim off the top piece so that the overall height is 8.5".
 Cut two purse front side panels, each measuring 5.5" wide x 8.5" high. Place one side panel right sides together with the pocket piece, aligning side edges. Pin. Stitch, using a 1/4" seam allowance. Press open.
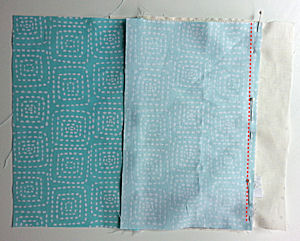 Repeat on the opposite side. Press open.
