|
|
|
|
| HOME SEW CRAFTS DECOR SHOP |
|
STAR FIRE
Stack & Cut Quilt Pattern |
| lessons holiday patterns sewing patterns |
Easy! Just Stack & Cut
cut multiple blocks at oncelearn double & triple cut
|
Experiment!
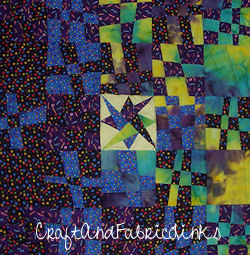
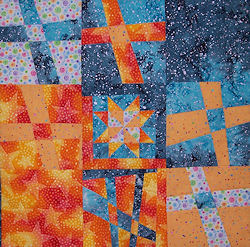
Flip blocks around, add contrast colors and more or less cuts. For the quilt block above, I used the Laced Star quilt block. For the orange print quilt, I used a variation of the Bear Paw block as my center square. Embellish with hand or machine embroidery, bling, ribbon, buttons or other decor. This is much easier than it looks! Using the "double cutting" and "triple cutting" techniques we will teach you, this is quite easy. For the most vivid results, choose contrasting fabrics with bright, bold prints. All patterns, images and text © Christina Sherrod of CraftAndFabricLinks.com unless otherwise noted. |
 Experiment with different prints for totallly different looks.
Item SizeGeneral Sewing Supplies
scissors
Multi Cut Blocks: fabric For the large double & triple cut blocks, choose 4 fabrics. You will need 10" x at least 40" width for print #1. For the other three you will need 20" x 40". I'll call these "multi cut block prints". Four fabric prints will create SIX different 2-color combinations (3+2+1).
For the center star points, I used the remaining fabric from my multi cut blocks. If you are using your same four fabrics, you will need a bit extra of prints 1 and 2. Purchase 1/2 yard of print 1, and 3/4 yard of prints 2, 3 and 4. You will also need a piece for your backing (approx 42" x 42") plus batting. You can use scraps for binding. For the Laced Star background print (I used a scrap piece of fabric I had from another project - light green dotted fabric shown in the laced star block photo), you will need a strip that is 4"-5" wide x width of fabric (width of fabric is approximately 42"). You can use this in the border strips as well. I used the background fabric from my laced start block for the binding around the upper right hand corner of the quilt (top and right side). I used a dark fabric for the binding around the left side and bottom. FABRICS I USED for "Multi Cut" Blocks (double cut and triple cut) |
 Center Block / Batting / Backing You will need one 8.5" square block for the center block.
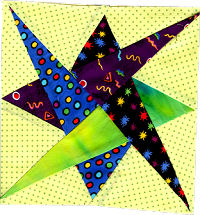
I chose the Laced Star as my center block. You can use any 8.5" block of your choice (8.5" includes the 1/4" seam allowance). For instructions on the Laced Star, go to:
Center Block / Batting / Backing You will need one 8.5" square block for the center block.
I chose the Laced Star as my center block. You can use any 8.5" block of your choice (8.5" includes the 1/4" seam allowance). For instructions on the Laced Star, go to:

print 1 |

print 2 |

print 3 |

print 4 |
|
From each of your four multi cut block prints, cut a strip of fabric 10" wide by w.o.f. (width of fabric). Cut another 10" strip. You will now have 2 strips, each measuring 10" x w.o.f. (about 42"-45") for each print.
Cut the strips into 10" squares. You will need the following number of squares:
NOTE: In addition to the above blocks, you will need 4 solid blocks. I cut two plain 8.5" blocks from print 2 and two plain 8.5" blocks from print 4 (all blocks are cut to 8.5" when completed). You will have a total of twenty 10" squares plus the four 8.5" squares. Set aside the 8.5" squares. Divide the 10" squares into piles by print and set aside. Set aside the unused fabric - you can use it for binding etc. |
Quick Reference |
Learn To Paint!free video tutorialsVisit my youtube channel. Free videos with step by step instructions. Paint beautiful paintings for your home. |

Please ShareI rely on advertising to keep my site free. Please share with friends. |
Privacy Policy & Terms Of UseBy using our website, you expressly consent to our Privacy Policy and Terms & Conditions. All Patterns, images and instructions are copyright protected. |