|
|
|
|
| HOME SEW CRAFTS DECOR SHOP |
Free Sewing BookSewing Lessons For BeginnersChapter Nine: Sleeve Installation |

|
|
|
-> table of contents
|
Articles, images and patterns © Christina Sherrod of CraftAndFabricLinks.com unless otherwise noted.
|
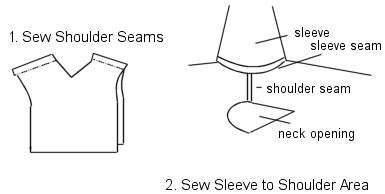
Sleeve InstallantionIt is best to follow the pattern instructions when setting in sleeves. I would like to point out two things, however. Non-Stretch Fabric / Standard Method Use a gathering stitch (chapter 6) to ease in the sleeve. Use one gathering line for gently easing in sleeves, and two gathering lines for setting in a puffy sleeve (stretch fabric can be gently stretched to fit, so a gathering line is not necessary). Transfer the pattern markers to your fabric (or mark with pins) and run your gathering stitches between the markers. They should run along the curved upper edge of the sleeve (the part that will go over the shoulder). This is where the sleeve must be eased in. The sleeve is sewn into place AFTER the shoulder and side seams are sewn and AFTER the underarm seam of the sleeve is sewn. The finished sleeve must be sewn into the circular arm hole opening. The gathering stitches assist in easing the curved part of the sleeve into place. Pin the sleeve to the garment, right sides together and stitch into place. The pattern instructions should have good diagrams on exactly how to accomplish this. Alternative Method - works well with knits In some cases, I use a different method for setting in sleeves than most instructions call for, and I find it much easier. Instead of sewing the shoulder and side seams and then trying to ease in the sleeve, do the following. Sew the shoulder seams as per instructions. Do NOT stitch the side seams of the garment. Sew the sleeve to the shoulder area of the garment, in between the marks or notches (front to back over the shoulder), and then sew the side seams last. I start at the sleeve end and sew on up under the arm and then down the side seam ending at the waist.
|
Quick Reference |
Learn To Paint!free video tutorialsVisit my youtube channel. Free videos with step by step instructions. Paint beautiful paintings for your home. |

Please ShareI rely on advertising to keep my site free. Please share with friends. |
Privacy Policy & Terms Of UseBy using our website, you expressly consent to our Privacy Policy and Terms & Conditions. All Patterns, images and instructions are copyright protected. |