|
|
|
|
| HOME SEW CRAFTS DECOR SHOP |
|
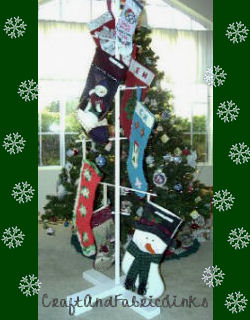
CHRISTMAS STOCKING
Wood Tree Stand |
| lessons holiday patterns craft patterns |

|
-> holiday patterns -> Christmas patterns
|
Make an adorable Christmas stocking tree! It can also be used for hanging other items, such as holiday banners, small quilts, artwork etc. A coat or two of paint and a tree skirt to hide the base, and it's all finished! Your own choice of paint, added glitter and other decorations will make it uniquely your own.
|
 Designer: Kevin Sherrod
 While you are at it, sew up some new Christmas stockings! I provide a free pattern that creates stockings that are beautifully finished, inside and out.
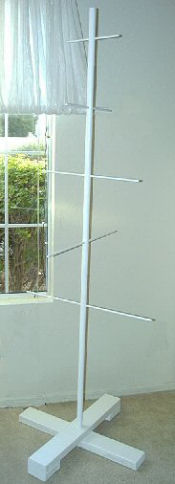
SizeThe main part of our stocking tree stand (center pole) is 68" in height. You can change the size of your stand to suit your needs. |
Supplies
We used a dowel of 1/4" diameter. The thickness of the dowel is your choice, but it must fit through the main post and it must be strong enough to hold your stockings when they are full. If your stockings will be heavy, you may want to use larger dowels for the branches, a larger trunk, and slightly larger base.
Trunk (center pole)
Base
Other Materials
|
 Branches
DirectionsTree
1. Measure down about 6" from the top of the trunk and mark the spot with a pencil. 4. Your shortest branch will be at the top, and each branch down gets longer. Your longest branch will be on the bottom of the trunk. Drill a hole for each branch, drilling each hole PERPENDICULAR to the one before it. Hole should be a size that creates a tight fit for the dowel. We drilled each hole to 1/4" and then sanded the dowel just enough so it would fit through tightly. 5. Push your branch through the hole. |
Base
2. Glue or nail the two base cross pieces together, with the piece with feet on top, and with the two pieces perpendicular to one another. 3. Drill a hole into the center of one of your base pieces, large enough to accomodate your trunk. 4. Glue or nail your trunk into the base. NOTE: You can change the dimensions of your tree, but be sure that the base is large enough to accomodate the tree when fully loaded. If your base is not wide enough, your tree will tip over! |
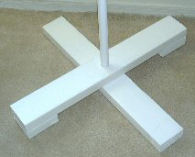 1. Glue or nail the two base squares onto the underside of one of your base cross pieces, even with the ends, to serve
as "feet". (refer to photo).
1. Glue or nail the two base squares onto the underside of one of your base cross pieces, even with the ends, to serve
as "feet". (refer to photo).
More Christmas Patterns
|
 Go to
Go to
Quick Reference |
Learn To Paint!free video tutorialsVisit my youtube channel. Free videos with step by step instructions. Create beautiful paintings for you home. |

Please ShareI rely on advertising to keep my site free. Please share with friends. |
Privacy Policy & Terms Of UseBy using our website, you expressly consent to our Privacy Policy and Terms & Conditions. All Patterns, images and instructions are copyright protected. |