|
|
|
|
| HOME SEW CRAFTS DECOR SHOP |
|
SEDONA LANDSCAPE APPLIQUE page 2
|
| lessons holiday patterns sewing patterns |

|
|
Page 2: rocks & shrubs |
DirectionsAll seams are 1/4"1. Create Shrubs
For each shrub: cut the web large enough to cover the pattern piece. Fuse it to the wrong side of your fabric, then cut out the shrub piece. Peel off the paper backing. Fusing: These are the instructions for Heat N Bond LITE: Using a dry iron set on the "silk" setting, iron the rough side to the WRONG side of the fabric for approximately 2 seconds. You will be ironing on the paper side of the web. The photo shows my "shrubs". The fusible web has been fused to the wrong side of each piece.
|
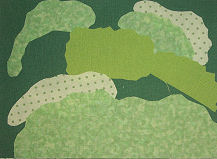 Each shrub can be cut from a separate piece of fabric, or several fabrics can be fused together to create a mixed-fabric shrub. When fusing fabrics, the fabrics must slightly overhang one another along edges - this is how they stay connected. Try to keep the layers to a minimum. If you layer too many fabrics, the applique can be too thick. For example, if you have an area where four fabrics come together and overlap, that area will have the thickness of four fabrics.
|
|
 Lay down the shrub pieces in order of pattern number. Fuse into place. Piece 9 will be on top. Allow the finished shrub piece to cool. Carefully peel the applique off of the pressing sheet. You will now have one, multi-piece "shrub applique". Set it aside.
2. Create RocksCREATE STRIPED FABRIC FOR ROCKS Lay out the four 6" x 9" rock fabric pieces. Cut four 6" x 9" pieces of fusible web. Following instructions on the web, fuse the web to the wrong side of each fabric piece. Do not remove the paper from the web.
|
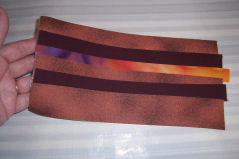
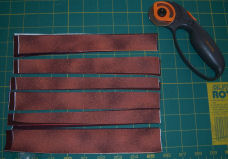 Stack the fabric pieces one on top of the other, right side up. Align all edges. Using a rotary cutter and large sewing ruler, make 5 straight cuts across the stack of fabric (cut through all four layers). The cuts can be angled and they do NOT have to be evenly spaced. Refer to photo.
|
|
 Separate your layers into four sets of strips. Mix and match the fabric strips to create "striped" sets. You should have four sets of fabric strips. Refer to the photo.
|
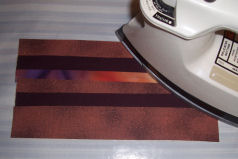
Peel off paper backs from the strips of one set. Lay the top strip onto the applique pressing sheet. Lay the next strip so that it's top edge is on top of the top strips lower edge; the edges should overlap approximately 1/8". This fuses the fabric strips together at the edges. Continue until all strips are fused together. Remember - the applique pressing sheet is between the fabric strips and the ironing board. The pressing sheet keeps the strips from adhering to the ironing board. Allow the piece to cool. The bond will become stronger as the piece cools. Carefully peel the piece from the applique pressing sheet. NOTE: You can mix and match stripes within sets, overlap by more etc. The only thing that really matters is that you have enough striped fabric to cut your rock pieces from.
|
|
CUT & FUSE ROCKS
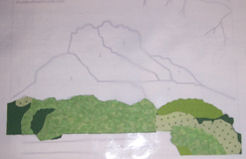
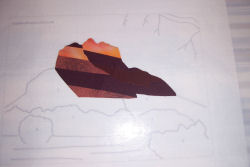
Lay the overall layout page on your ironing board, right side up. Lay the applique pressing sheet over the layout page. The overall layout will show through the pressing sheet. Lay down piece #1, then piece #2. Press with iron, according to web instructions. Continue in order of pattern number until you have all 5 pieces fused in place. Piece #5 will be on top. Allow to cool. |
 Arrange pattern pieces 1, 2, 3, 4 and 5 on the striped fabric. Cut out the pieces.
3. Fuse Rocks & Shrubs To BackgroundStitch sky fabric to ground fabric, right sides together (remember that this project uses 1/4" seam allowances). Press seam allowance toward darker fabric.
NOTE: your rocks and shrubs will come close to the outer edges of the background, but there will be a small gap. This is ok. I designed it this way to cut down bulk in the finished seam allowances. There must not be more than 1/4" gap between the rocks and shrubs and outer edges of the background piece, however. |
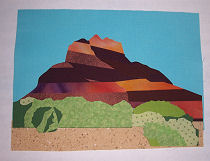 Lay rocks onto background piece so that the base of the rocks just covers the seam. Press with iron to fuse into place. Lay the shrubs over the rocks, following the overall layout. Press with iron to fuse into place.
 |
|
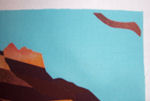 Fuse web to back of branch fabric. Using pattern piece provided, cut out branch piece. Peel off paper. Fuse to sky in upper right hand corner, 1/4" from edges.
Related Project
Decorate your patio or interior with colorful "no-care cactus". The cactus and ladybug are actually painted rocks! |
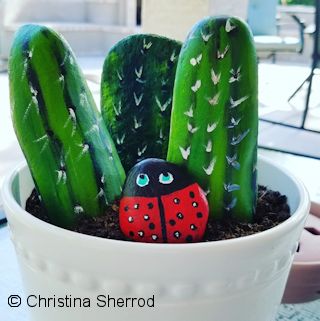 Painted Rocks Cactus Garden
Quick Reference |
Learn To Paint!free video tutorialsVisit my youtube channel. Free videos with step by step instructions. Paint beautiful paintings for your home. |

Please ShareI rely on advertising to keep my site free. Please share with friends. |
Privacy Policy & Terms Of UseBy using our website, you expressly consent to our Privacy Policy and Terms & Conditions. All Patterns, images and instructions are copyright protected. |