|
|
|
|
| HOME SEW CRAFTS DECOR SHOP |
|
DIY MASTECTOMY BRA
|
| lessons holiday patterns sewing patterns |
-> sewing patterns -> medical
|
UPDATED!Page 1: full prosthesis cover (mastectomy)Go to Page 2: lumpectomy prosthesis & sock cover Any bra can be a mastectomy bra!Also see: Clothing Patterns |
The Problem With Mastectomy & Lumpectomy BrasA good friend of mine came to me hoping for a solution to her problem finding good fitting mastectomy bras. She had a prosthesis she was happy with, but could not seem to find a bra that was comfortable, affordable and in a style and color she liked. She hoped that I could help. I realized that there were two solutions. She could sew a pocket into a regular bra, creating a mastectomy bra, or she could create a pouch to cover her prosthesis, and place that into her bra. She changed bras frequently and hated the idea of having to stitch a pocket into every bra. Therefore, she liked the second idea. She could make one pouch, cover the prosthesis, and just move it from bra to bra. The reason for the need for the pouch was that the prosthesis was made from a rubber type substance. It got hot and uncomfortable against her skin. Another benefit of the outer pouch is that it is often impossible to find a good fitting prosthesis. She needed more padding on the upper half than what the prosthesis offered. Due to the outer pouch, she was able to slip both the prosthesis, and also add extra padding into the top section. After hearing her story, I realized that many women had a need for this type of item. I wanted the project to be easy for anyone to do. I did not use a sewing machine. I did not even purchase fabric; my friend had a pair of panties that were the wrong size, but made from comfy, stretchy fabric. Perfect! Page 2 shows how to create a cover using just a sock - no sewing at all! Super simple. Page 1 directions are for a full prosthesis, or partial prosthesis that covers the lower part of the breast. If you have a partial prosthesis for the upper breast area, or wish to create your own prosthesis, go to Page 2: lumpectomy prosthesis & sock cover. MAKE YOUR OWN PROSTHESIS: Once you have your pattern, you can also create your own prosthesis. Stuff it with fiberfill for a light comfortable feel. Experts suggest that the prosthesis should be equal in weight to the unaffected breast, but many women say that they are not comfortable with a "heavy prosthesis". I will leave that up to you. |
PAGE 1: FULL PROSTHESIS COVERFor this method, a pattern is created for a covering for a full mastectomy prosthesis. The covered prosthesis can then be worn comfortabley and moved from bra to bra. For an inexpensive prosthesis and no-sew cover, go to Page 2: lumpectomy prosthesis & sock cover |
Item SizeCustom make your pouch to fit your prosthesis. |
Supplies
bra stretch fabric (I cut up a pair of new, inexpensive panties) needle thread scissors paper pencil pins |
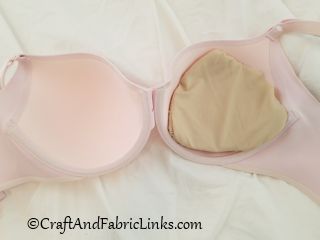
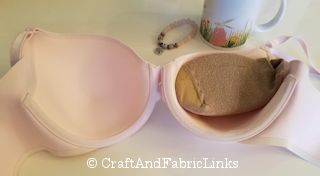
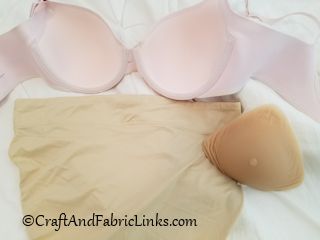 bra prosthesis
Instructionsuse 1/4" seam allowanceRead through all directions completely before starting the project.
Place the prosthesis right side up on a piece of paper. Draw a line 1/4" from the outer edge, all the way around. The 1/4" allows for the seam allowance. Cut out the paper shape. This is the back side. |
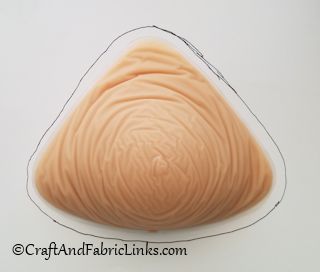 1. Create back side pattern piece.
|
Place the paper shape onto a second piece of paper. Trace around it, again using a 1/4" seam allowance. NOTE: The reason the front pattern piece is cut larger is that the front side of the prosthesis has a larger surface area than the underside of the prosthesis (which sits fairly flat against the chest). The front fabric must be larger in order to fully cover the larger surface area. For my friend, 1/4" larger all the way around was sufficient. She wears a "B" cup. You may need to cut your front piece larger. |
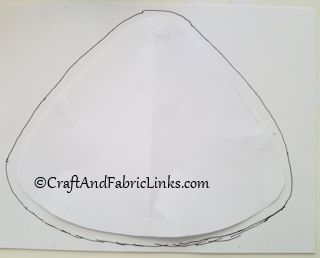 2. Create front side pattern piece.
|
Use the larger pattern piece (front side) to cut a piece of fabric. Place the prosthetic on a flat surface, back (flatter) side down. Place the fabric piece over the prosthesis to be sure that it covers the front (moded side) of the prosthesis, plus has an excess 1/4" all the way around (for the seam allowance). If the fabric piece is too small, use it for the back side, and create a new piece for the front side. It should drape over the prosthesis. It might seem as though it doesn't fit, but the fabric will be gathered around the edge. 4. Using the smaller pattern piece, cut a piece of fabric for the back side of the prosthesis. |
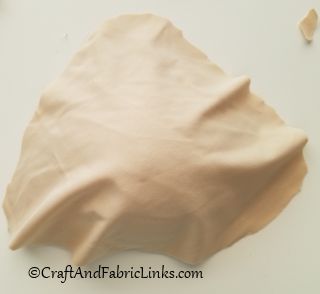 3. Test size - cut fabric.
|
Using a pencil or pins, mark the top point and wider base corners on the front (larger) piece of fabric. Use your needle and thread to make a gathering stitch all the way around the outer edge of the fabric piece, close to the edge. NOTE: Marking the top and base corners will be important later. You will be stitching the two pieces of fabric together and they must be lined up correctly. |
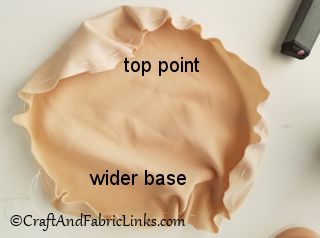 5. Gather outer edge.
|
Pin the two layers together, adjusting gathers so the edges line up. The layers should be placed right sides together. Our fabric did not have a right and wrong side. Use pins or a pencil to mark off a 2" opening. The opening is needed for turning the pouch right side out, and for taking the prosthesis in and out of the pouch. Tip: Make the opening on the OPPOSITE side of where you want the opening on the finished piece to be. When turned right side out, it will be on the opposite side. I didn't do that, and it was fine. It is only important if it is important to you which side the open area ends up on. |
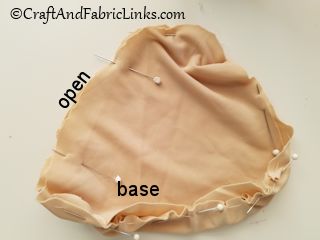 6. Pin layers.
|
Stitch all the way around, using a 1/4" seam allowance. DO NOT STITCH the area that is to be left open. This type of fabric is very slippery, and difficult to stitch, so I actually found it easier to use hand stitching. Also, I tested it this way to be sure anyone could do this - no "fancy" equipment needed. |
 7. Stitch layers - insert prosthesis.
|
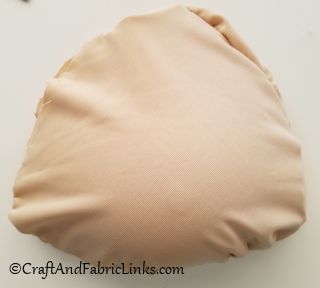
Turn the pouch right side out. Use the opening to insert the prosthesis into the pouch. Optional: Add any extra padding needed into the pouch as well (prosthetic devices don't always fit correctly). Place the covered prosthesis into the bra. My friend loves her pouch. The rubbery prosthesis is no longer against her skin, as it was in a regular bra. She can transfer it to any bra, so she no longer needs special mastectomy bras. She can easily hand wash the pouch as needed. |
Related Project
No sewing necessary! Use an inexpensive bust enhancer and sock. Transfer from bra to bra. |
 DIY Lumpectomy Prosthesis
Quick Reference |
Learn To Paint!free video tutorialsVisit my youtube channel. Free videos with step by step instructions. Paint beautiful paintings for your home. |

Please ShareI rely on advertising to keep my site free. Please share with friends. |
Privacy Policy & Terms Of UseBy using our website, you expressly consent to our Privacy Policy and Terms & Conditions. All Patterns, images and instructions are copyright protected. |